German Short Rows
a photo tutorial
The German Short Row is my favourite — I should say my only — short row technique.
It is simple and straightforward.
It produces neat, well nigh invisible shaping, as on a shoulder on a Ziggurat sweater, just as for an example…
the name
My German friends look askance at the name, German Short Row.
I’m not sure who named it, but it seems to be the common way to refer to this technique among Anglo knitters.
Incidentally, Germans call the stitch on which everything turns a Doppelmasche (a double stitch), which makes perfect sense. As we shall see.
Short-row shaping is useful for all manner of knitting – shoulders, sock heels, striped shawls, nonstriped shawls and more.
Let’s begin.
We are working in plain stocking stitch for this tutorial.
turning on a knit row (RS):
1. Knit to last (however many) stitches.
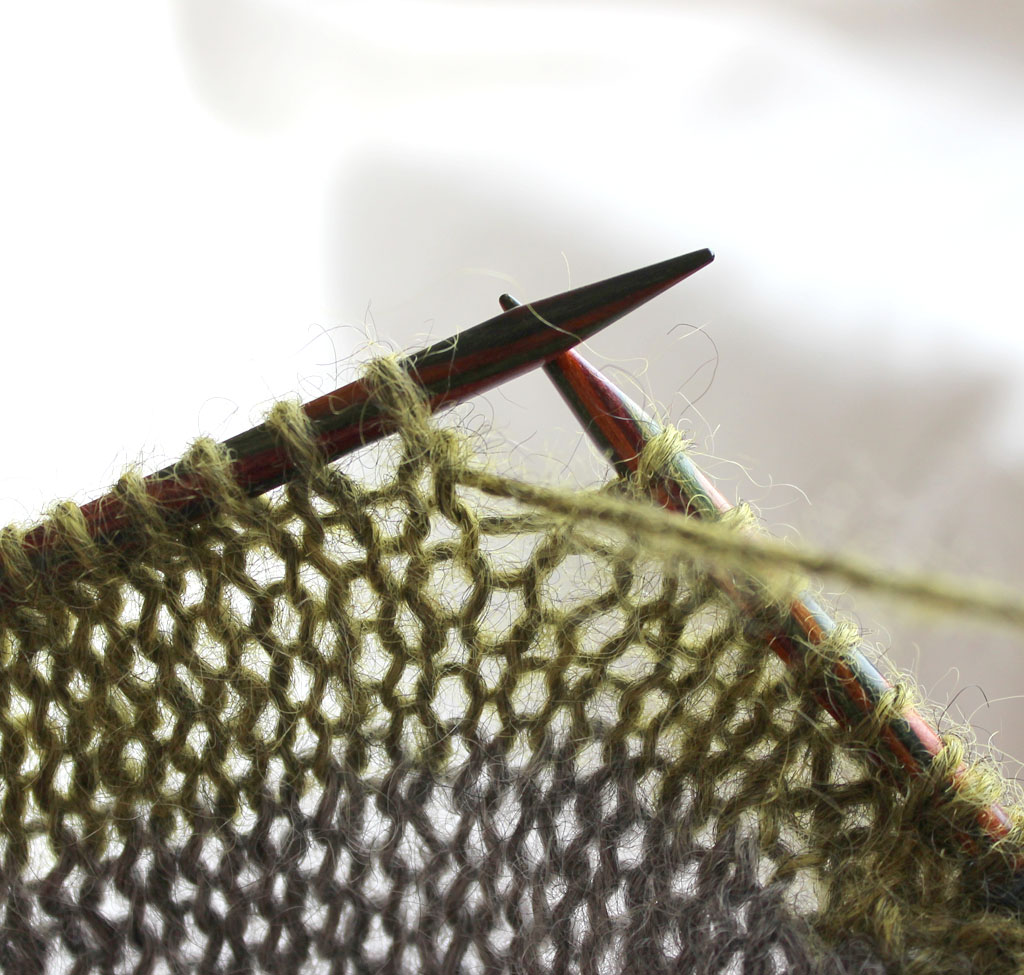
3. Slip 1 stitch purlwise with yarn in front.
In Åsa Tricosa patterns this is symbolized by sl1^
![]()
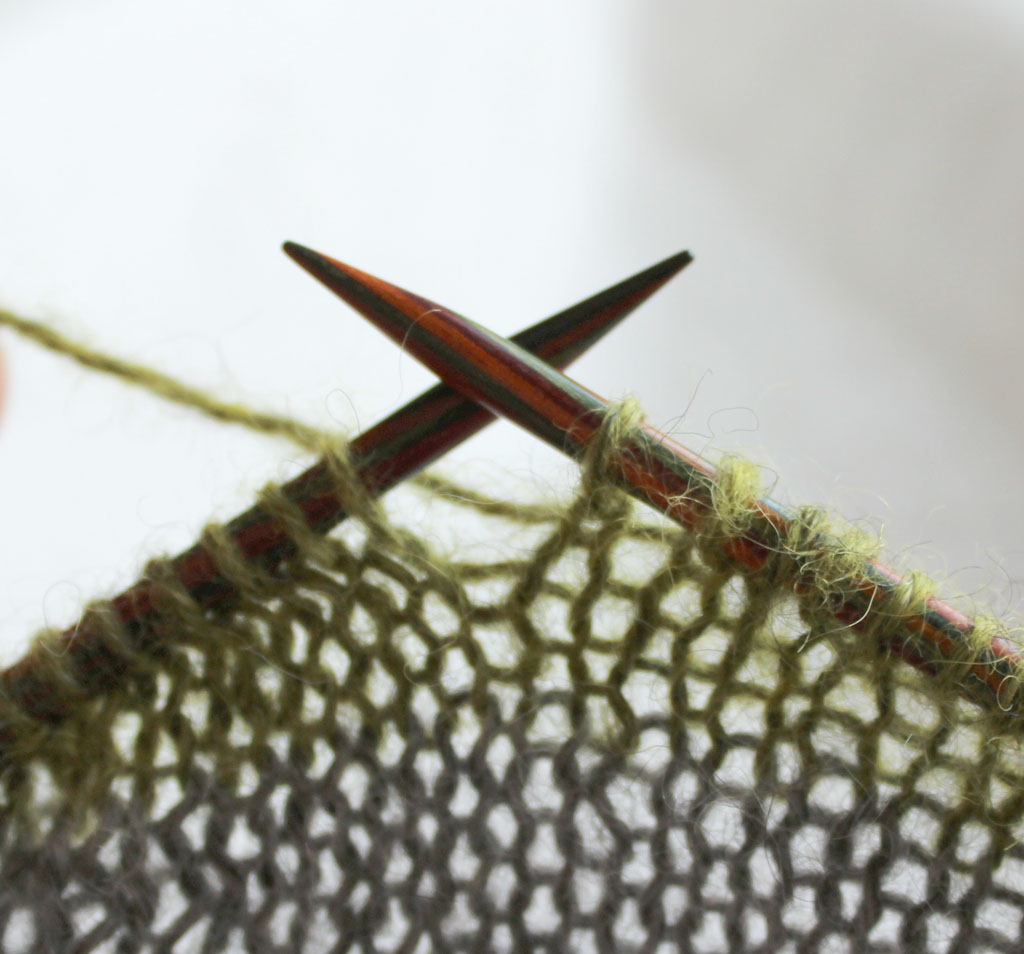
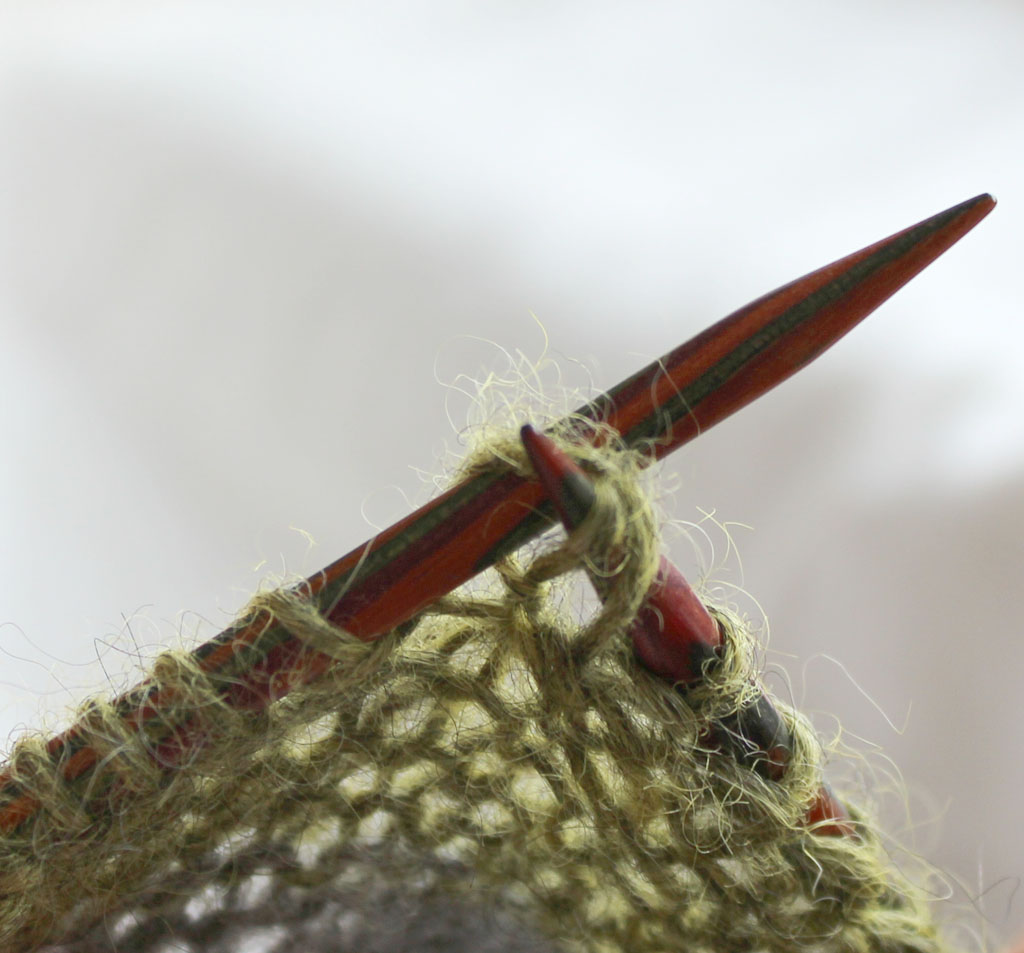
4. Bring yarn up, over and back to pull on the slipped stitch until it slides around to show two legs.
It will look like a double stitch, a Doppelmasche. We treat (and count) this as a single stitch.
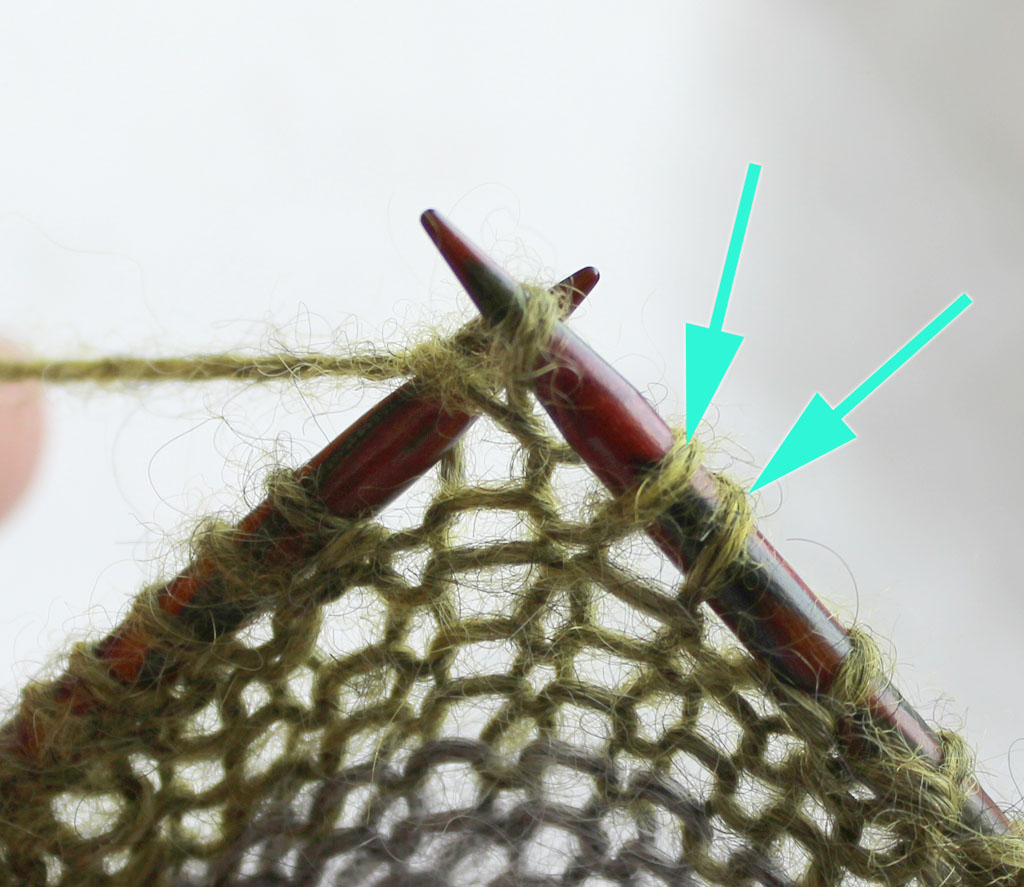
5. Bring yarn to front in order to purl next and following stitches as usual while keeping the tension
on the slipped stitch.
The arrows point to the two legs of the sl1^ just made, the Right Needle is purling the following stitch.
Work to end of row and turn to work on RS.
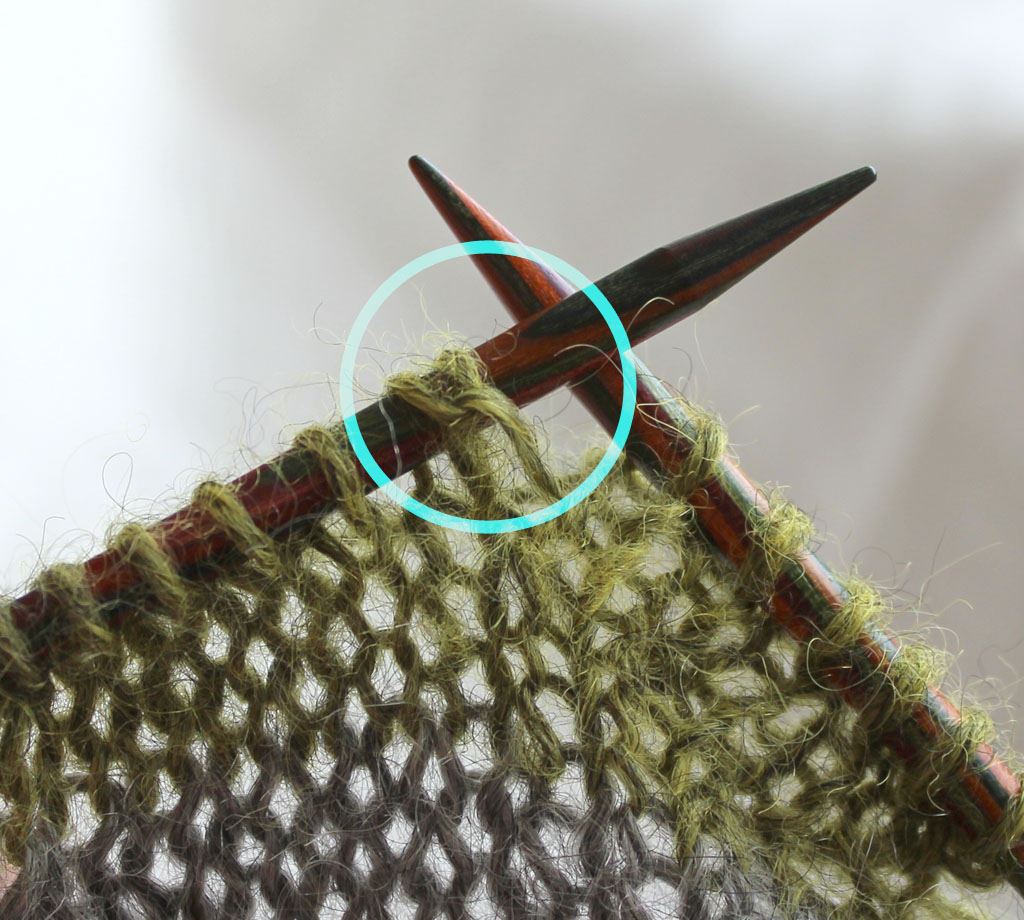
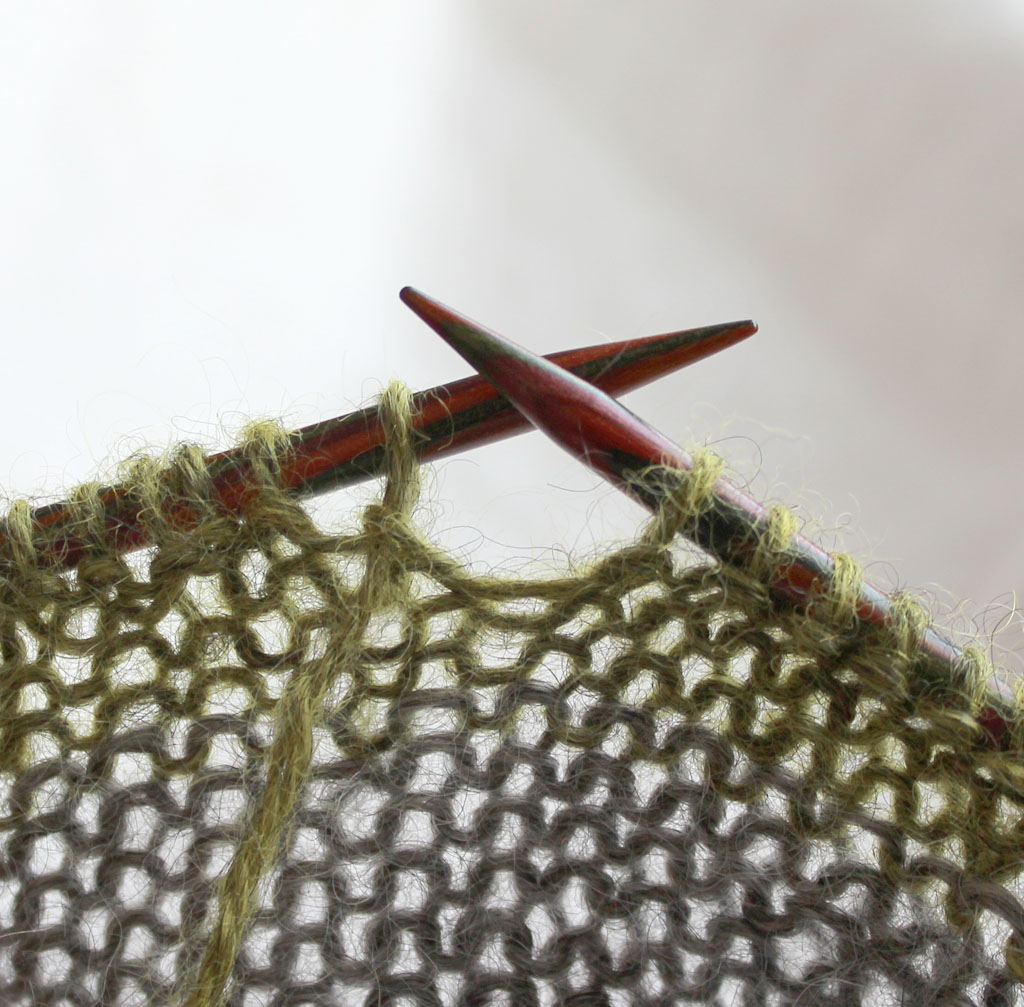
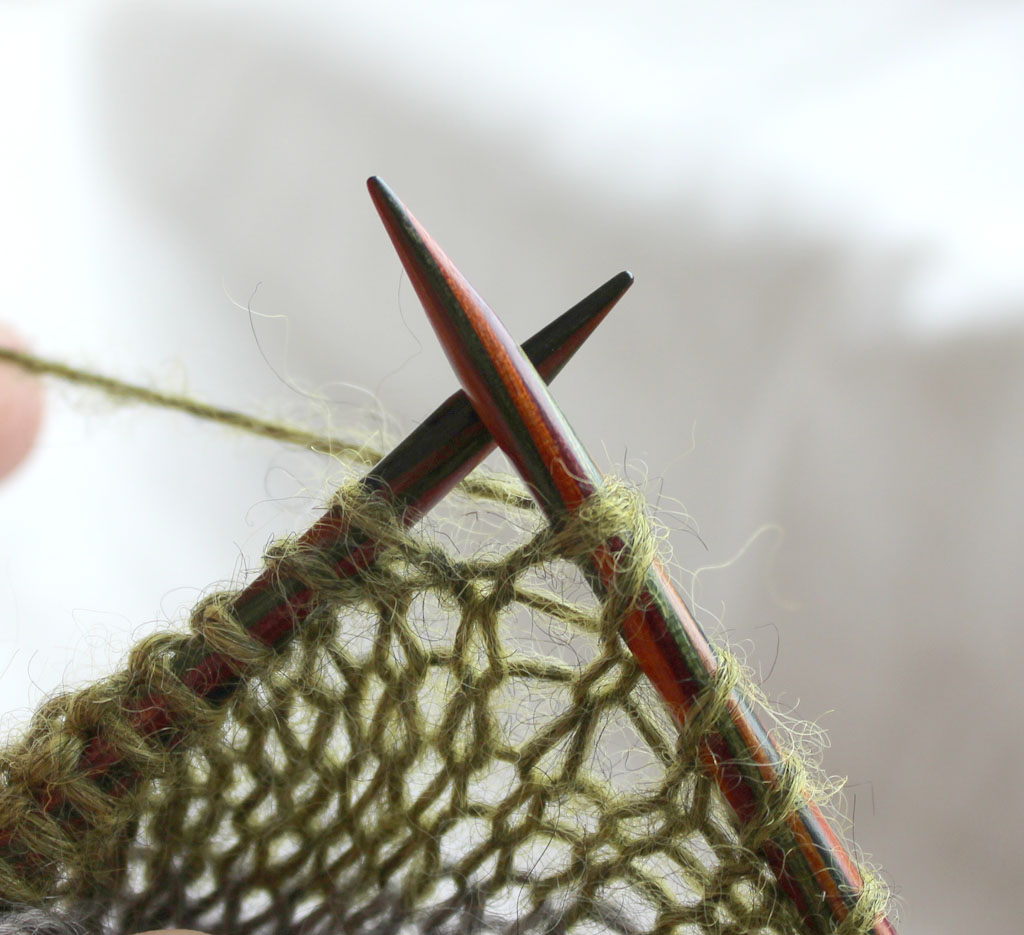
6. Knit to the slipped stitch (the sl1^).
Everything in the circle belongs to that slipped stitch.
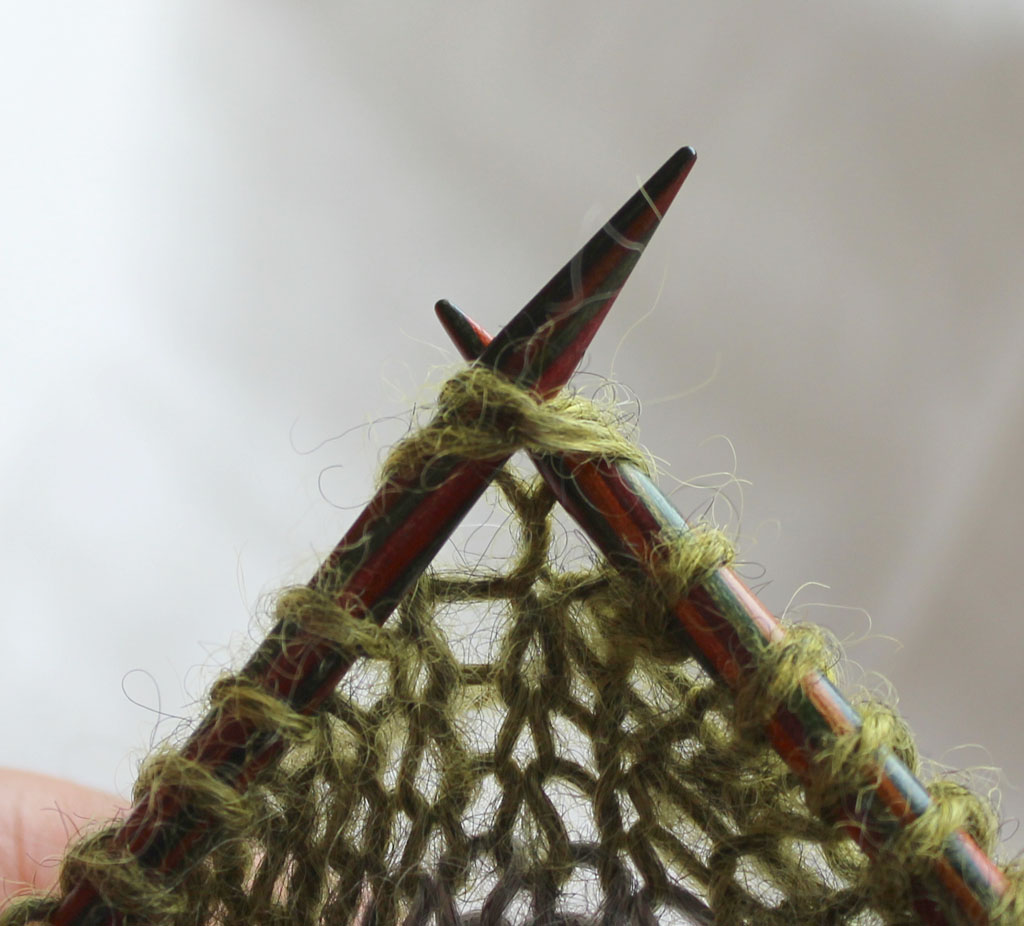
7. Knit through both legs (through the centre of the entire bundle) as if the sl1^ were a normal single stitch.
In Åsa Tricosa patterns this is symbolized by k1^
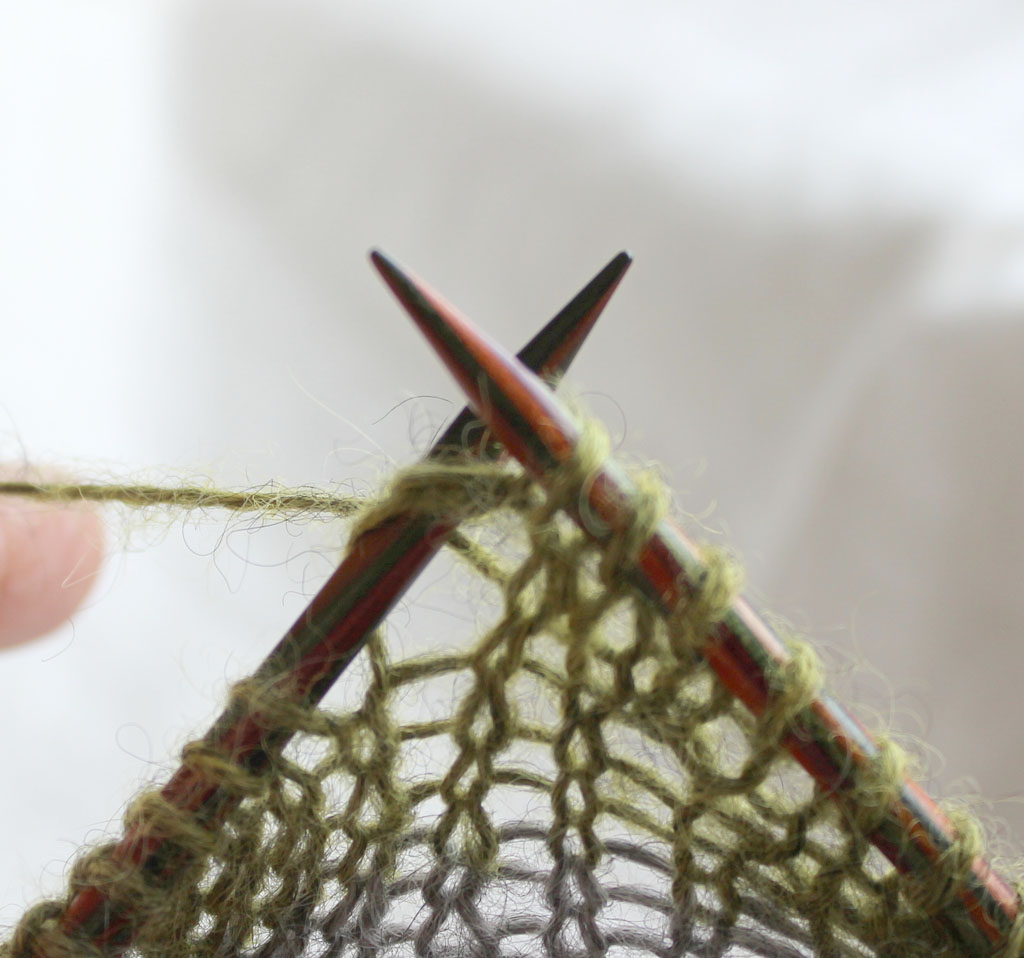
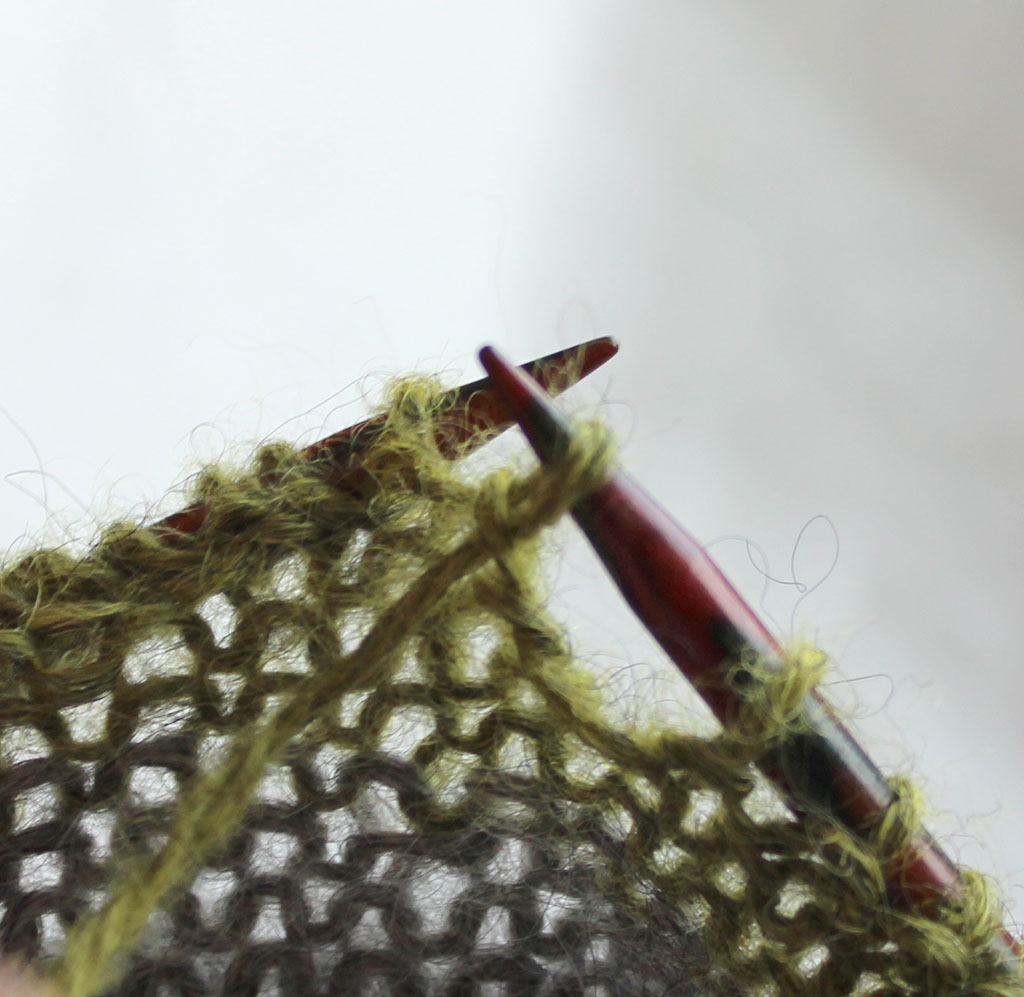
7b. The k1^ in further progress.
Then continue knitting as usual.
That’s it. You’re done.
turning on a purled (WS) row:
1. Purl (however many) stitches, turn (that is, flip work to work on RS).
2. (RS) The yarn is in back. Bring yarn to front.
The sl1^ is always done with yarn in front or forward – on the knit side you need to bring it forward.
On the purled side it is already in place.
![]()
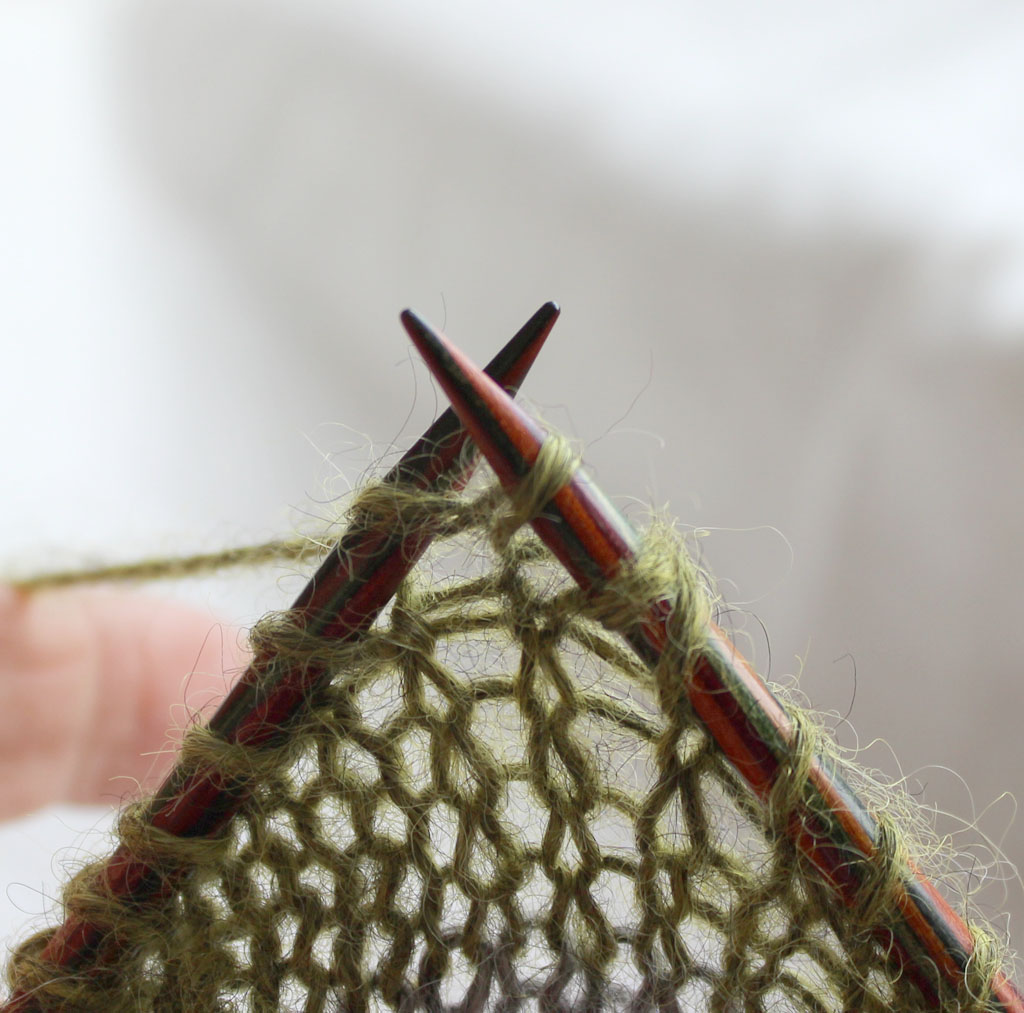
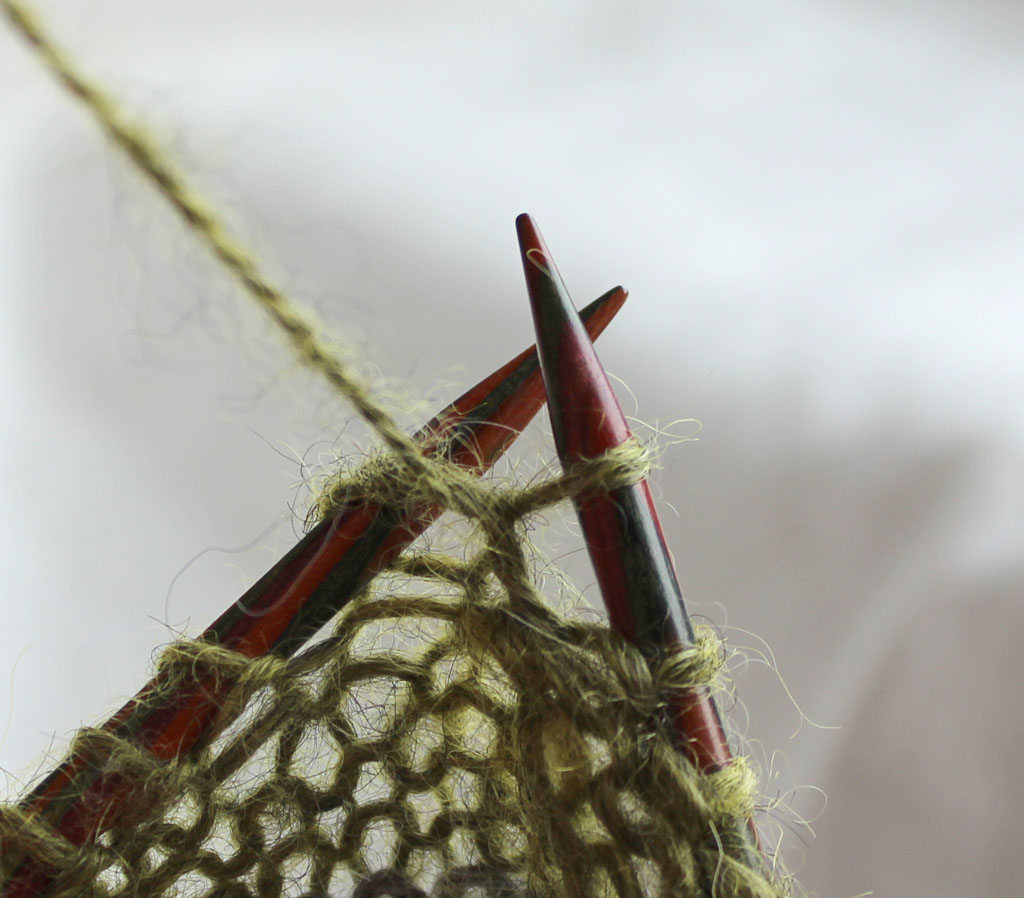
3. Slip 1 stitch purlwise with yarn in front (as before) = sl1^
4. Bring yarn up, around to the back and pull (downward) to make the slipped stitch slide
around to (the back) to show two legs.
5. Knit next stitch and following stitches as usual, while keeping the tension on the slipped stitch.
Knit to the end of the row, turn (flip work to work on WS).
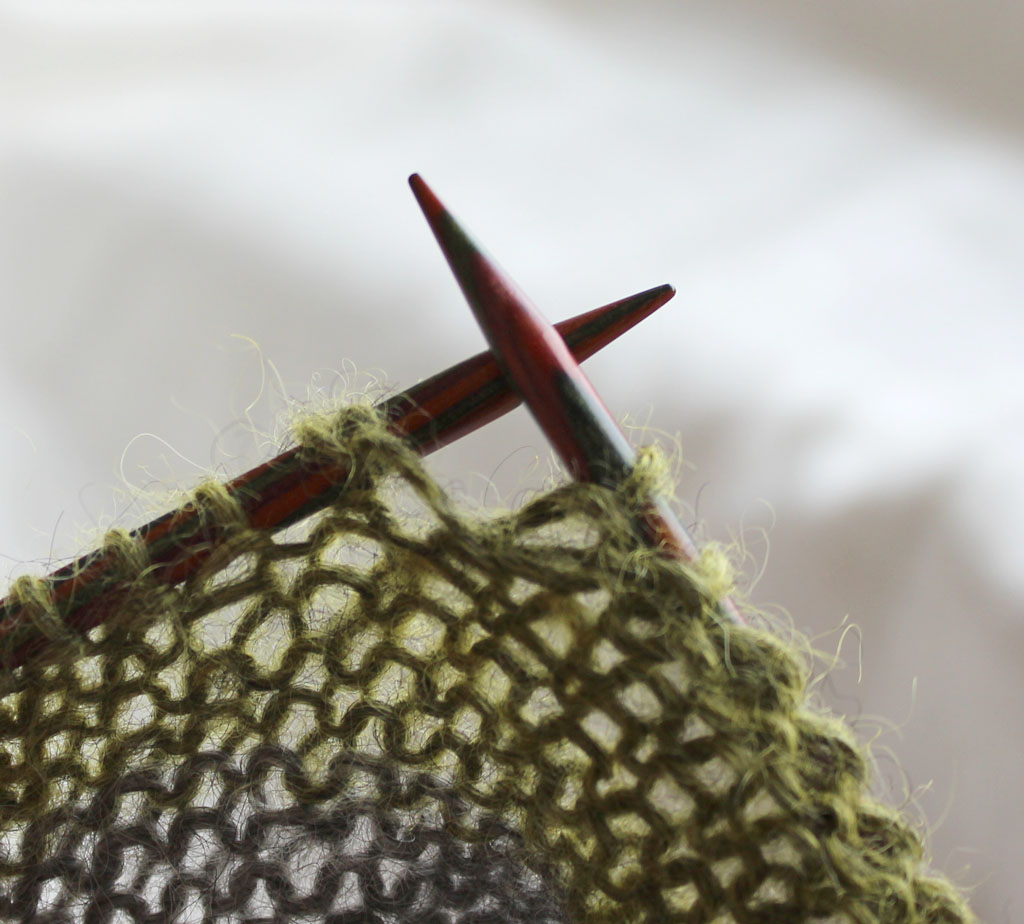
7. Purl through both legs of the slipped stitch as if it were a normal single stitch.
In Åsa Tricosa patterns this is symbolized by p1^
7b. Purling through both legs (p1^) in further progress.
That’s it. Really.
Neat & simple.
Want to know what else is up my knitted sleeve? Sign up for the occasional Åsa Tricosa Newsletter.

49 Comments
This is great! I was reading some less clear instructions elsewhere that left me confused and frustrated. But your instructions and step-by-step pics make it crystal clear. Thanks so much. Now I can get back to the knitting. 😉
Oh, that pleases me no end! (And I really do love that particular shortrow method.)
Thank you very much for the clearly explained instructions and accompanying photos, they help immensely. Now to knit the Ilha.
My pleasure!
I love your instructions! They are such a great help! Thank you so much for posting!
Thank you! That is most pleasing to know.
And I’d better get kicking with some of the tutorials that I’ve queued up.
Thank you so much for taking the time to post these pictures and instructions. They are crystal clear and I just incorporated the directions into a shawl I’m working on. They are invisible, which is enormously pleasing.
I’ll also take the time to mention how much I enjoy admiring your designs and projects. You have a lovely sense of style and I’m grateful to be a part of your woolly online community!
Oh, thank you so much for letting me know! How very pleasing that the tutorial helped you – I wish you all the luck with your no doubt wonderful shawl!
Very clear photos and instructions. Thank you.
One question…if you have a pattern that says: K 10 sts, W&T, with German Short Row do you K 11 sts before you do the turn?
I used this short row technique years ago and love it. Unfortunately I’ve forgotten how to count the stitches.
I’m glad the tutorial helped.
Yes, I’d think so… yes! The wrapped stitch corresponds to the slipped-around (sl1^) stitch.
Finally clear written instructions! thank you!
This is wonderfully clear and the pictures are excellent. Thank you for posting this as I will be utilizing this for all my upcoming socks that have short rows that have left me with a feeling of less than perfection. I look forward to future posts.
Great short row photo tutorial. I am looking for patterns to knit “toe-up socks using German short rows, using sock weight yarn and 2.5 mm needle” size: children , women and men. Any info would be helpful.
Thanks,
Anna
Have you looked at Yarnissima patterns? I’m not sure which short row method she uses, but she has great toe-up sock patterns.
[…] Many knitters are familiar with the ‘wrap and turn’ technique when creating short rows, but there are a few more. ‘German short rows’ produce very neat, nearly invisible shaping. An excellent photo tutorial can be found here: http://www.asatricosa.com/german-short-rows/ […]
Thank you, this is a really easy to follow tutorial. The pattern I’m knitting has a very poor explanation, but now it all makes sense!
Wow! Thank you for your clear instructions and the photo as well I finally understand short rows! It does make sense …….finally…..thank you!
Great tutorial!! Understood fully BUT my ppattern now says “pick up the two wraps and knit them together with the wrapped stitch” I do know there are no wraps to pick up, so do I just knit 2 w/t, but I would knit 3 and do the german wrap???
Yes, that’s it!
Knit 3, turn, then begin the next row with the special slipped stitch (sl1^).
Thank you! It now makes total sense 🙂 Appreciated, and I am glad to have found your site!
Me too! Thank you!
[…] Asa Tricosa published a lovely tutorial about German short rows. […]
This was very helpful even if not a video. It has been way too many years since I did any sophisticated projects so bear with me, please.
I am working on a shoulder. So I do the short stitch on both ends, slowing working my way to the center, right?
Again, thanks for you generous help!
Hello there! That depends entirely on what pattern you are following and which sort of sweater construction you are using.
So, for example, if you are knitting one of my Ziggurat patterns you would be working top down and one shoulder at a time:
Work each short row from neck toward shoulder cap to get the slope higher at neck and lower at sleeve “seam”.
Hello!
I did a google search for DS German short row, as it was used in a pattern but gave no explanation. Thank goodness that you have these very clear instructions for this technique. You saved me a lot of frustration and guesswork.
Thank you,
KnittingBetsy in the old, gray Seattle suburbs
(Loveknitting on Ravelry)
Oh, that’s so pleasing to know. Thank you for writing!
Yeah written directions with pictures…. after days of frustration watching videos, I think I can now proceed. Thanks
Yippee!
But isn’t it great that there are so many tutorials and videos available?! It’s a Schlaraffenland for knitters! 🙂
Hi,
How can this be translated if my right side is a purl row & the wrong side knitted? Thanks
In brief: No translation is necessary, really.
On the turning row the slipping/pulling is the same regardless of whether you are working on a purled or a knitted stitch.
On the following row as you work this double-legged stitch, you can purl or knit it (through both its legs) as you please.
Great tutorial! Thank you 🙂 But I’m left with one question, why is the technique for creating the stitch the same on both the knit and purl side? I’ve been trying to use German short rows on a sock heel, and it seems that once I complete all the double stitches and then resolve them that the two side of my heel look different–as though the stitches are twisting different directions. Am I just overthinking this? Thank you again!!
Maybe you are entering the stitch from the wrong direction?
Or maybe the two legs of the slipped/pulled stitch have become crossed?
That’s the only explanation I can come up with without seeing what you are doing – for yes, the slipping/pulling is the same on both RS/WS and then the stitch is worked according to pattern (knit or purl).
This tutorial is so helpful. An issue I am having, though, in making my first pair of socks with German shirt rows, is that I keep finding dropped stitches when I come back to a spot where I have worked a ds. I think I have everything down about the technique EXCEPT working the ds properly. Any idea what I might be doing wrong?
Tricky… perhaps you are not knitting through the centre of “cross hatch” — as in photo 7.
You need to make sure you have two legs on either side of the tip. Hope that helps. You can’t have draughty socks! We’re going towards winter, after all (at least in my hemisphere).
Thank you so much for this wonderful tutorial! It is by far the most clear and understandable one I have found for German short rows. My only frustration has been that my pattern wants me to make one at the beginning of a row and it has ended up looking sloppy. I also did not do well with the knitted side wrapping over the top but your photo and reply to a previous question/comment has taken care of that! Again, THANK YOU!!
Great tutorial! Thanks. In my pattern I am supposed, on the next RS row, to knit the wrapped stitch together with the next stitch, yo, then continue several more reps of [k2tog, yo,] to the next w & t. Do I start the intervening WS row with knitting my double stitch as one, or leave it unstitched until I do the next RS row and k3tog when I come to it? I think the former but need to be sure as I will need to do it more than 50 times
I’m not entirely sure I know what you are describing, but my instinct is also the former — you essentially always work your short-row stitch on the next row (and then work it as one stitch, whether it is with a wrap as in wrap & turn or a two-legged stitch as in a German short row… or the stitch-marked loop of a Japanese short row).
Thanks for the tutorial. I am making these short rows as instructed, but there are little holes at the end. You can really see where the short rows were created. Any suggestions?
Maybe try a different tension? Sometimes it’s better not to try to tighten too much. Alternatively, perhaps you are not tightening the pulled stitch enough. The type of yarn used can also make a difference. Some yarns hide the wonky stitch better than others. Finally, have you looked at the fabric after blocking? Many yarns will bloom with blocking and this also helps smooth out the knitted fabric. Hope this helps! (If you are desperate, I would recommend trying the somewhat more fiddly Japanese short row – it is more fiddly but also the most invisible of all short row techniques.)
åsa
How can I work the German Short Rows on a k1,p1 rib? Thank you.
I think it would work the same way as for stocking stitch – just keep track of your rib.
I haven’t tried it, but will now.
Thanks for writing!
åsa
I’m working on the shoulder shaping for a cardigan and would like to use German short rows for the shaping, but also use the three needle bind-off to join the front and back pieces. Is this doable?
Thank you…..
I don’t see why not.
Just make sure to go through both legs of the short-row, ‘wonky’ stitches when you bind them off.
Good luck!
åsa
This is the clearest, simplest explanation of German short rows that I have EVER read! It really changed the experience of knitting them for me, into something pleasurable and not nerve-wracking. Thanks so much!
[…] mds = Make double stitch. Slip 1 stitch purlwise with yarn in front. Bring yarn up, over and back to pull on the slipped stitch until it slides around to show two legs. If you are unfamiliar with the technique see a great tutorial with images here. […]
I am using a single ply fingering weight and the german short row stitches(which the pattern calls for) are very visible in my stockinette
sweater. Should they be invisible and not seen easily?
Thanks
I prefer invisible, yes. Are they visible also after blocking? Sometimes blocking hides unevenness. When I’m knitting with an unforgiving yarn, shiny or in a light colour, I resort to the Japanese Short Row, which is the most invisible of them all (or at least of the ones I know how to knit!). Perhaps give that a try?
I bought the Ziggurat book 2 weeks ago, and am just starting my first, the simple summer Ziggurat. I haven’t done German Short rows before but the tutorial seems very clear.
However, I am stuck on row 1. I have turned to the RS after the set up row, and the first stitch on row one is a Sl1* (no hat symbol!). if I follow instructions and turn back to wrong side the working yarn isn’t in the right place?
Hello Julia!
Thank you for buying my book! Where are you seeing the Sl* symbol? In the eBook? Or in the individual PDF of the pattern (both digital versions are downloads via Ravelry and included with the printed book)? It is a sl1^ (with the hat symbol) and if you are not seeing it, my only guess is that it might be an illegitimate copy or some odd source?