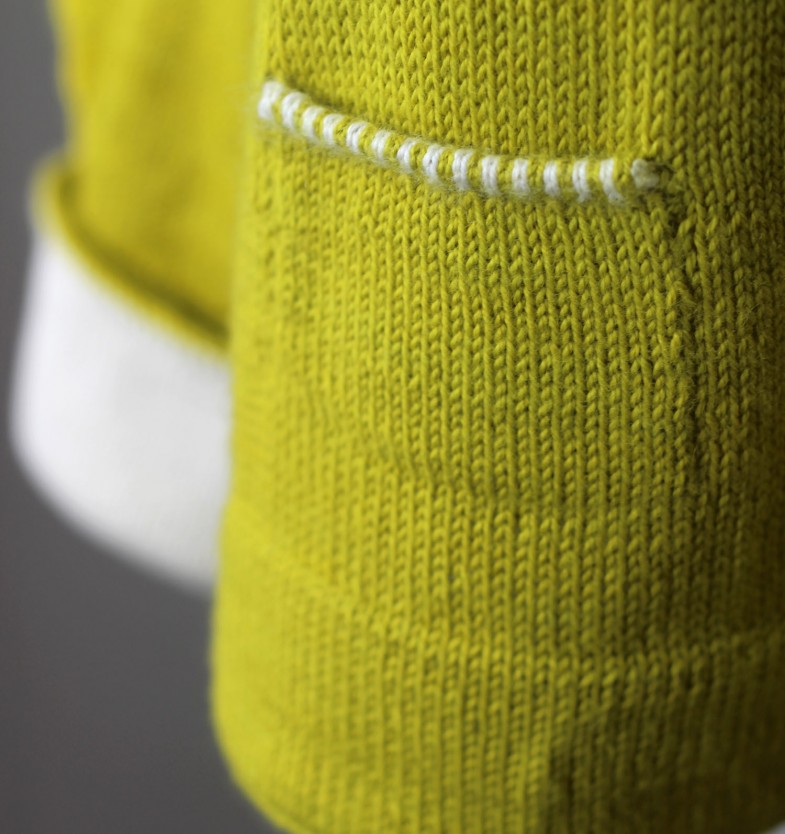
Flap Pocket Tutorial
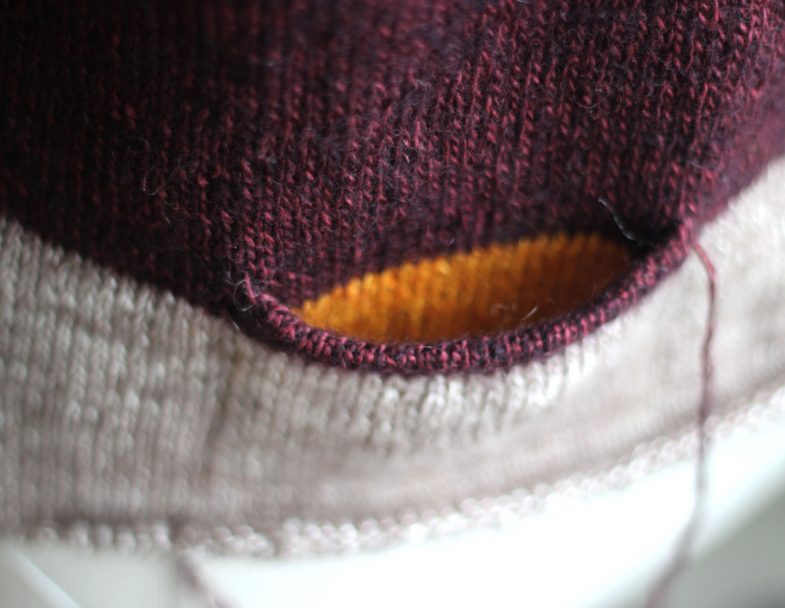
Photo tutorial for the single layer Flap Pocket with a Welt edging
(top-down)
This Welt Pocket, features on the Sammelsurium Pullover in Åsa Tricosa Ziggurats: 16 elegantly seamless knits
This single layer Flap pocket is constructed like the Mayhem cardigan dk pocket – a lining flap is worked as an extension in the front fabric of the pullover and then attached to the wrong side of the fabric as you continue knitting the pullover rounds towards the hem.
The Flap pocket is easier than the double-knitted version of the single layer pocket featured on the Bambasala cardigan, the Bento Boksy pullover, and the Vaudeville tunic.
And no… I couldn’t resist tweaking precisely how the lining flap is attached. Just a little… so this pocket differs a smidge from the Mayhem cardigan pocket.
Another difference: the Mayhem pocket has no edging – the ribbed fabric of that cardigan keeps the edge from rolling or expanding. A prepared folded Welt does the trick on plain fabric pullovers like Sammelsurium and Simple Ziggurat.
For an explanation of the abbreviations used, see Abbreviations.
How to knit the Flap Pocket with a Welt Edging
(In the Ziggurat Book this is a variant of pocket 2c.)
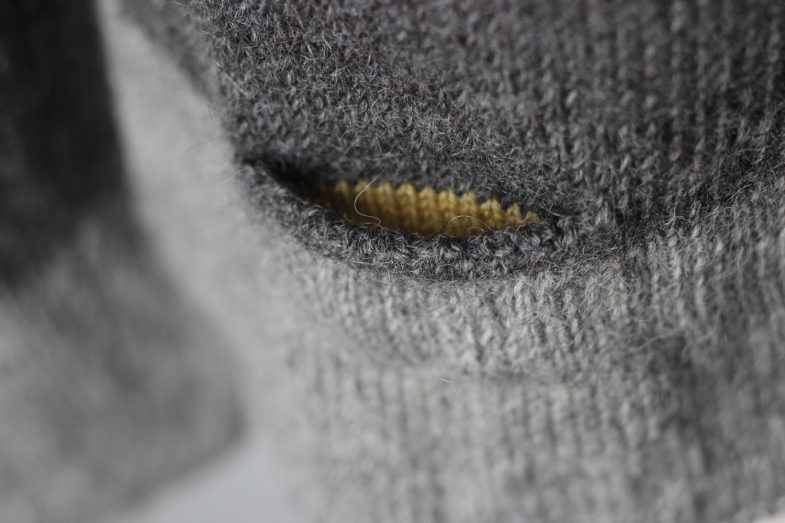
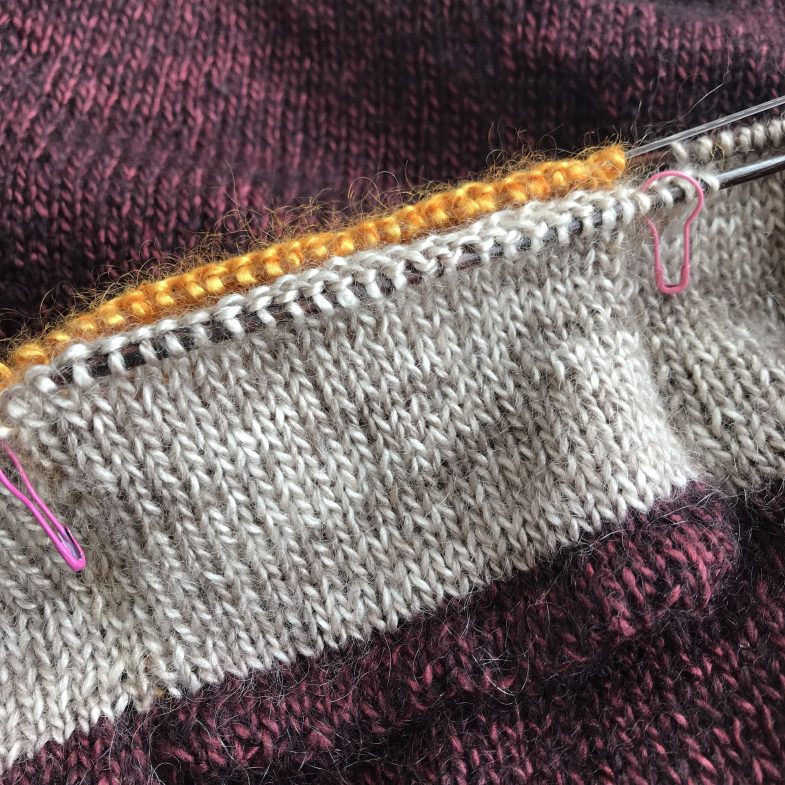
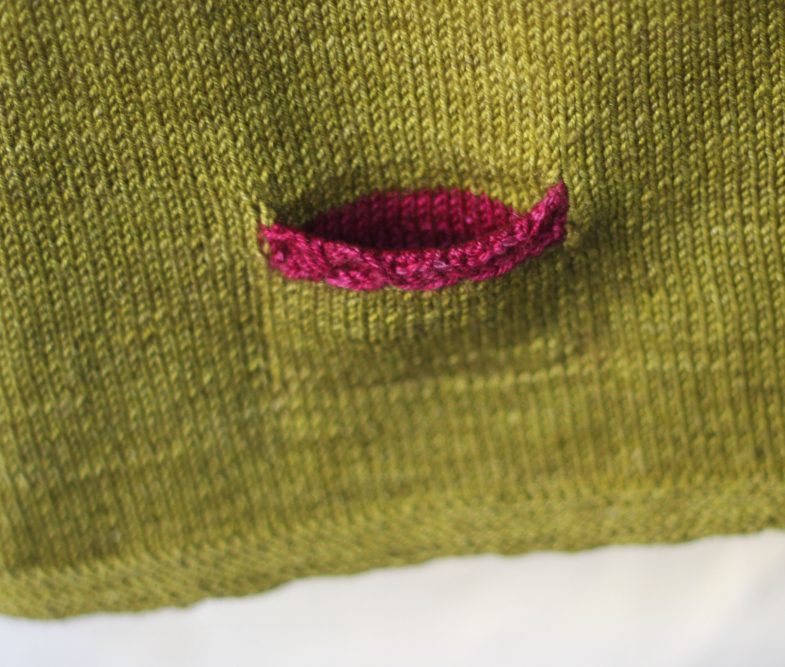
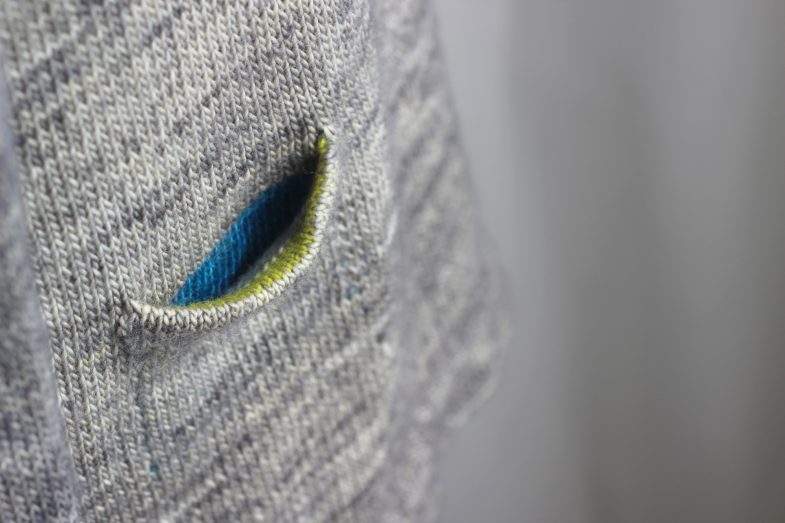
The stitch counts given below are for the mini pocket on Sammelsurium (the grey pullover) – 17 sts wide. The maroon pullover with the orange peekaboo lining is a (forthcoming) Faery Wings Simple Ziggurat. That pocket is 25 stitches wide. You can of course make the pocket wider or smaller as you please.
Stitch count guide for wider or smaller pockets:
A = width of pocket
Circular needles
N1: Body stitches
N2: 1-2 sizes smaller than N1 (for the Welt, and later used for the Lining Flap)
Circular or double pointed needle
N3: Same size as N2 or smaller (temporary holder for 3-needle closing of Welt)
Prepare a Welt
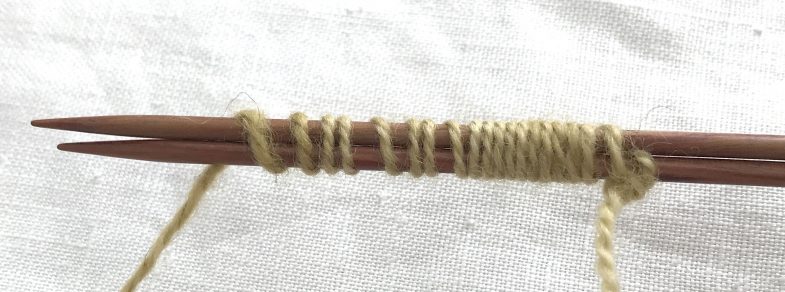
Winding on stitches
With N2, a separate ball of MC, and using the Winding Provisional Cast On, wind on 17 (A) sts.
Note: in the photos I used a contrast yarn for better visibility
R1 (RS): Loop cable, knit the wound loops to end. 17 (A) sts
17 (A) provisional sts sit on the cable and are not worked at this time
R2 (WS): Purl.
Work 6 additional rows of stocking stitch, ending with a WS row.
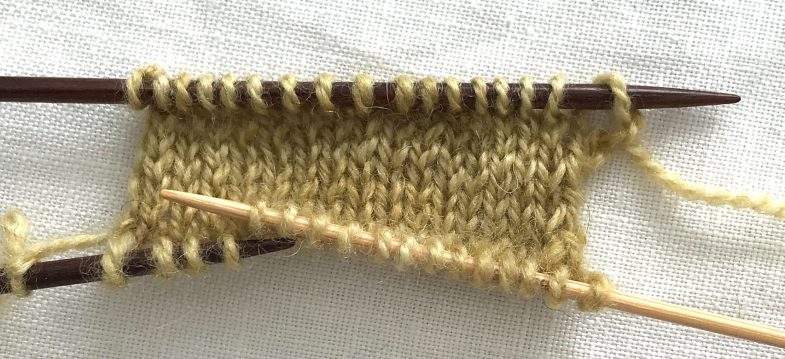
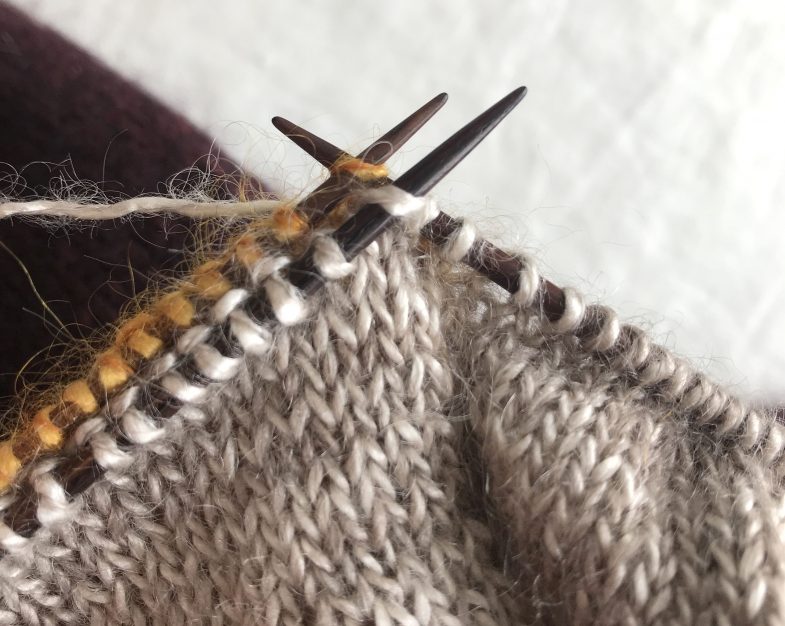
Sliding provisional stitches to N3 (discard the slipknot at far left; it’s no longer needed)
Slip the provisional sts onto a spare needle (N3), fold Welt double with RS facing out, N2 in front of N3, tips parallel and pointing in the same direction. With N2 knit the two layers together, working 1 stitch from N2 and 1 st from N3 for each k2tog. 17 (A) sts
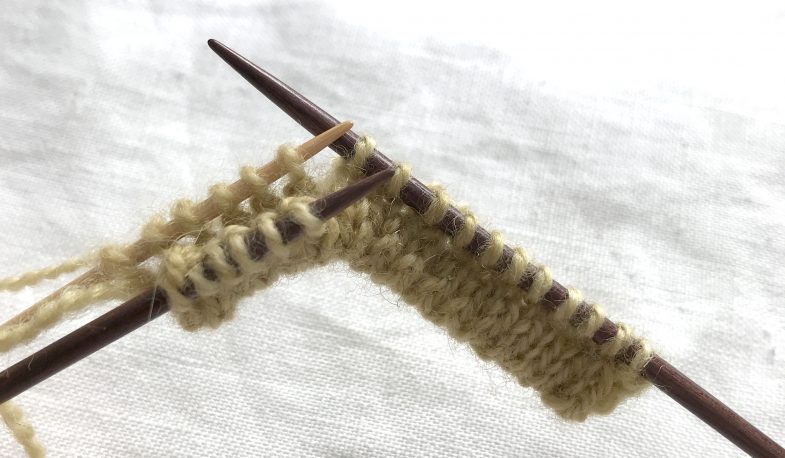
Knitting the folded Welt together
Attach the Welt
Sammelsurium and Simple Ziggurat have a contrasting band on the lower part of the body. The Welt is attached over the 3 final rounds of main colour (MC). The instructions below reflect this. If you are not using a contrast colour (CC), ignore the instruction to change colour.
On the 3 attaching-rounds the live Welt stitches on N2 are not worked but left alone.
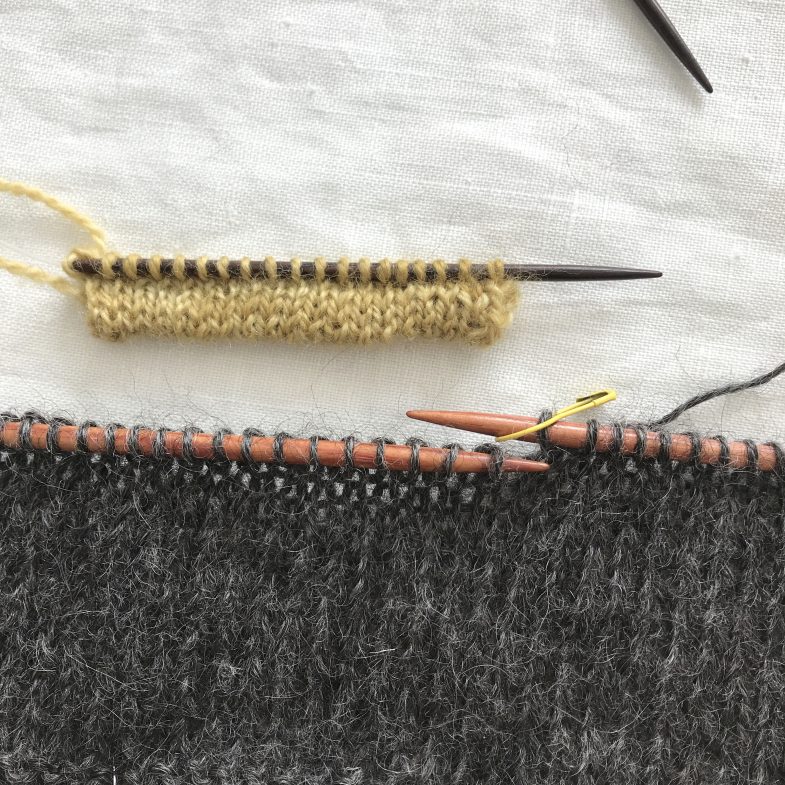
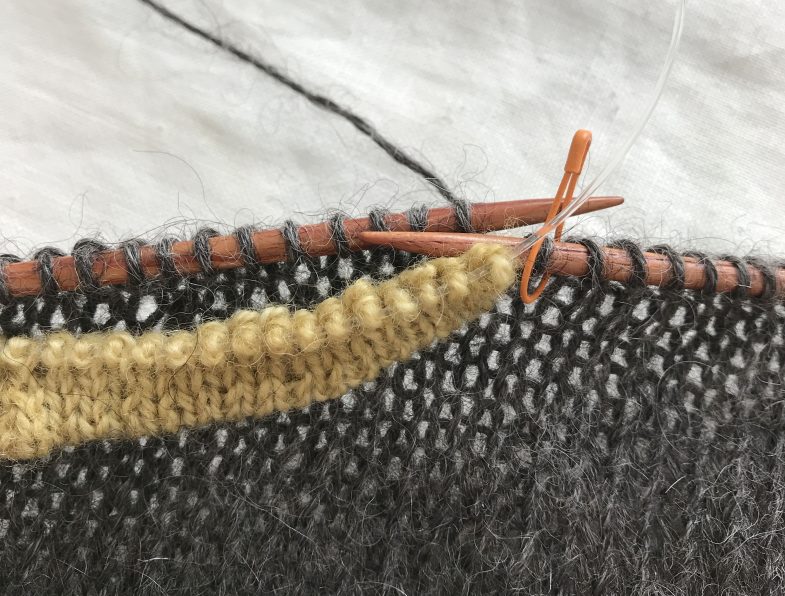
Welt ready to be attached, Pocket marker (Pm1) is placed (slide Welt sts onto the cable of N2 so that the Welt is easier to manipulate)
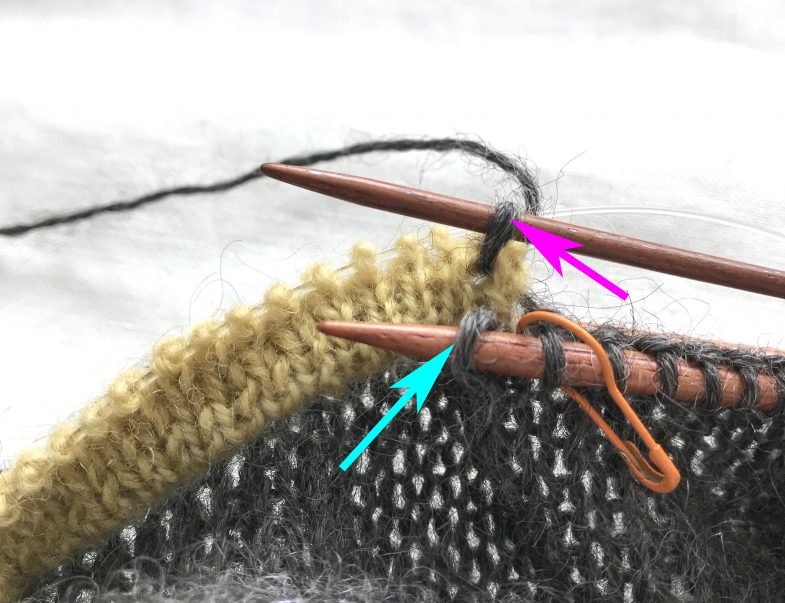
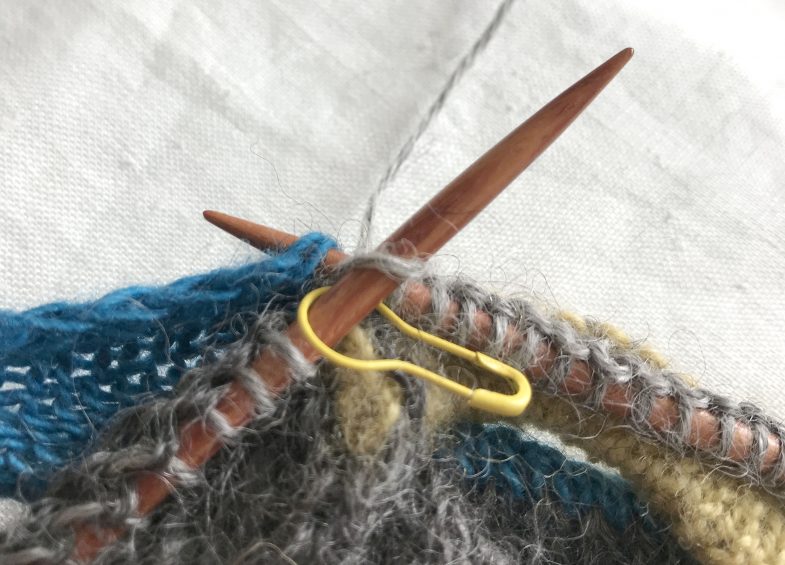
Rnd 1 (N1): Knit to Right side marker, sm, knit 5–10 cm (2″–4″) past the side marker (for Sammelsurium: k15 (15, 15, 20, 20) [20, 25, 25, 25, 25] sts), pm (Pm1), place Welt with folded edge facing towards top of pullover, RS facing up (WS has purl bumps)…
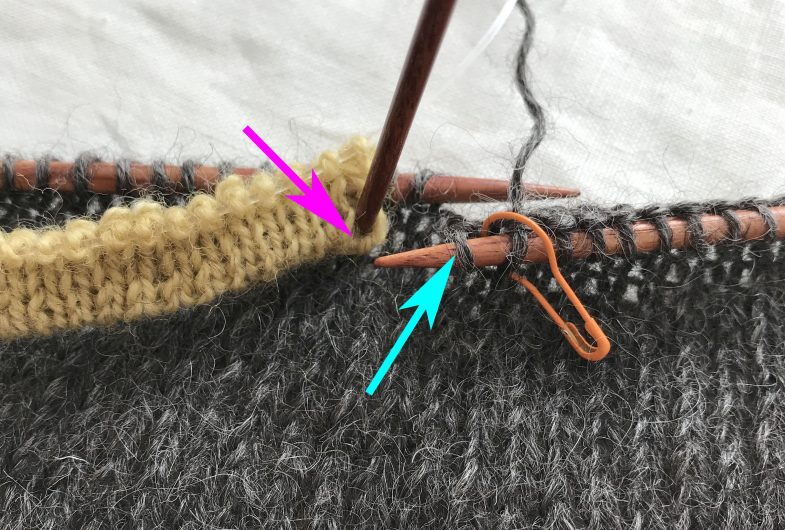
Slipped stitch (blue arrow) and corner of Welt (pink arrow) through which to fetch yarn (Pm1 is orange in this photo, sorry!)
Rnd 1 (cont): Sl1 kwise, insert RN tip (or use crochet hook) into outer corner of Welt to fetch yarn through both layers…
The slipped stitch (blue arrow) has been passed over the fetched stitch (pink arrow) – the Welt has been slipped behind the work to make the attachment stitches more visible
Rnd 1 (cont):… psso (pass slipped stitch over)…
If your Welt has slipped behind, swing it between the needle tips to front of work (so you can work the Body stitches (grey)
Rnd 1 (cont): Continuing along grey Body stitches, k15 (A-2).
It’s time to attach the far end of the Welt:
Before attaching the far end: slide stitches on N1 Right Needle tip onto the cable (this makes it easier to make the attachment manoeuvre)
Pink arrow points to the yarn fetched through both layers of Welt corner (you can use a crochet hook to fetch the yarn if that seems easier). Blue arrow points to the next Body stitch
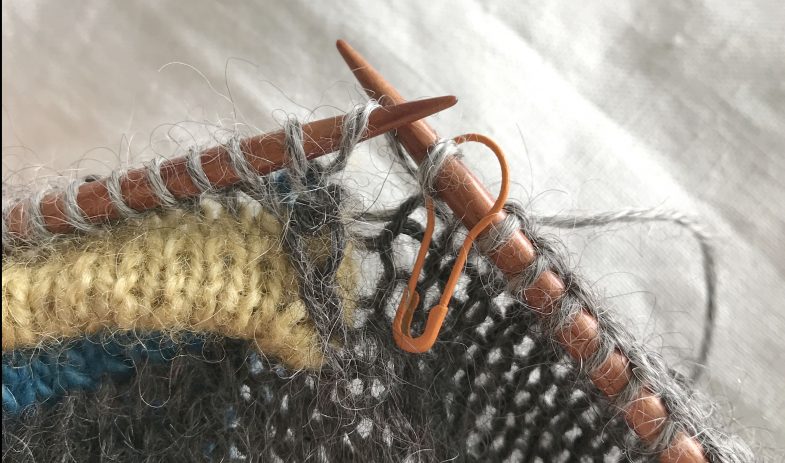
Rnd 1 (cont): Insert RN tip into upper corner of Welt, fetch yarn through both layers, place stitch on LN…

Blue arrow points to the slipped body stitch which is passed over the stitch fetched through Welt (pink arrow)
Rnd 1 (cont):…pass next Body stitch over and off LN, (slide N1-stitches from cable back onto Right Tip), slip resulting stitch to RN, pm (Pm2), work to end of round. Rnd 1 is complete.
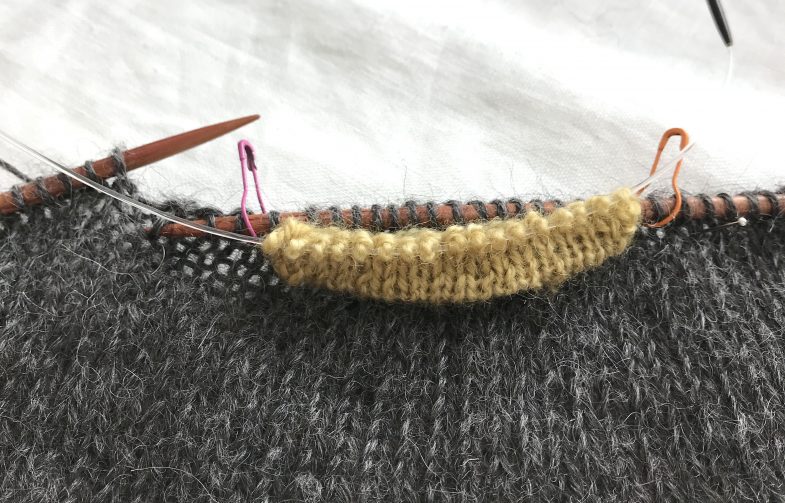
Now, simply complete the round. The Welt is attached at each corner but is otherwise hanging free
Rnd 2: As Rnd 1, but attach Welt through stitch above the previously attached edge stitch (and slip instead of place markers).
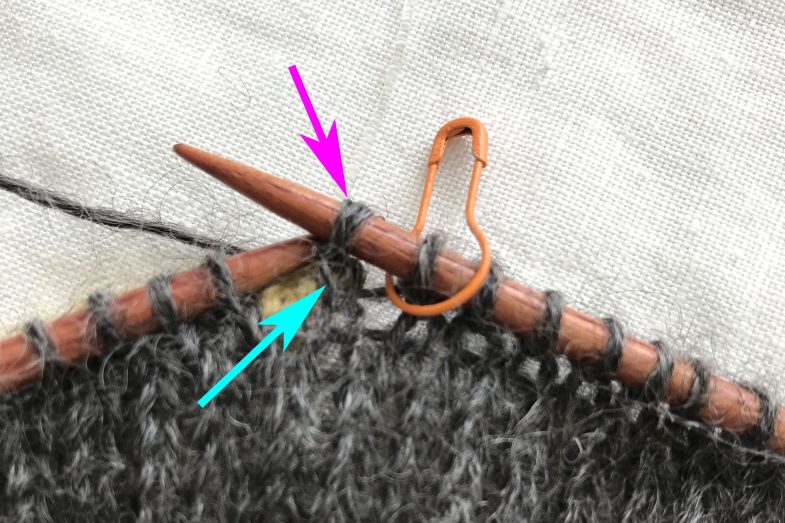
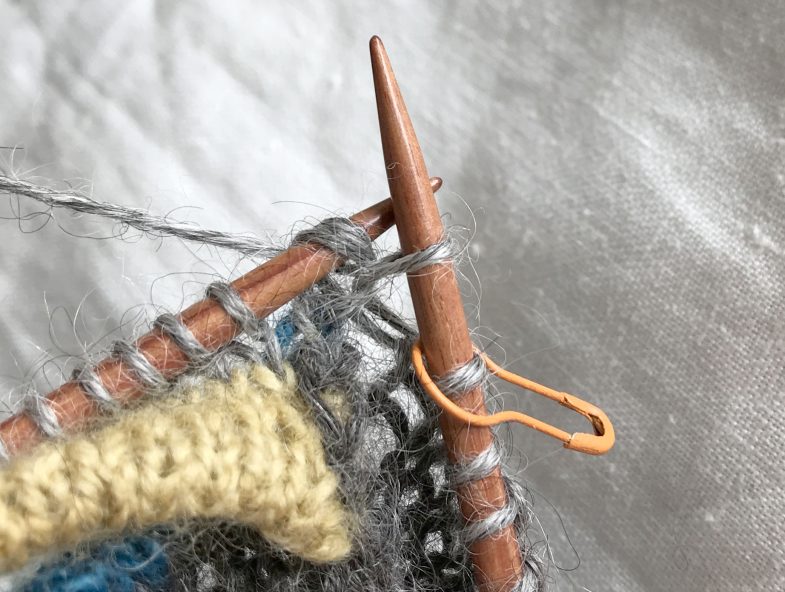
Rnd 3, at Pm1 – blue arrow points to the slipped stitch, pink arrow points to the next fetched stitch
Rnd 3: As Rnd 2.
(If MC is darker than CC, also work Optional Rear Shaping (see pattern), cut MC. If instead CC is darker, work the rear shaping on the second round of CC).
Pocket Lining (& change to contrast colour)

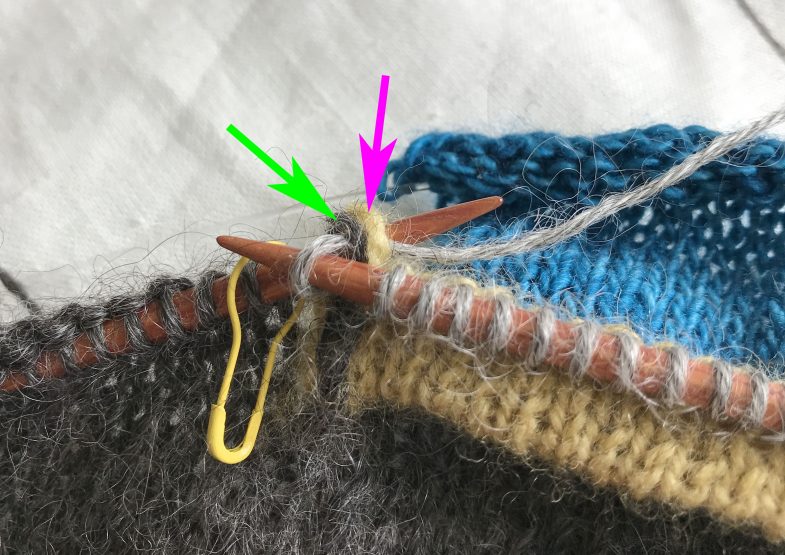
On the first Round/Row of Making the Lining Flap, the WELT is integrated into the Body sts and becomes the front of the pocket that bridges the opening. The Welt and Body sts are then set aside while you finish the Flap. The blue arrow points to the Body stitch (after Pm1) that is worked as an SSK together with the first Welt stitch. The green arrow points to the stitch before Pm2. This stitch is worked as a K2TOG with the last Welt stitch – but only AFTER the lining Flap has been knitted.
Change to CC (CC1 – here a lighter grey)
Rnd 1: With CC1, knit to Pm1, sl next stitch onto N2 (the Welt needle), ssk, (one Body stitch tog with first Welt stitch), then continue with N1 along Welt stitches; knit to last Welt stitch, sl1, set N1 aside (no stitches remain on N2).
Pull on N1 Right Tip to slide stitches onto the cable.
Pocket Lining – the Flap
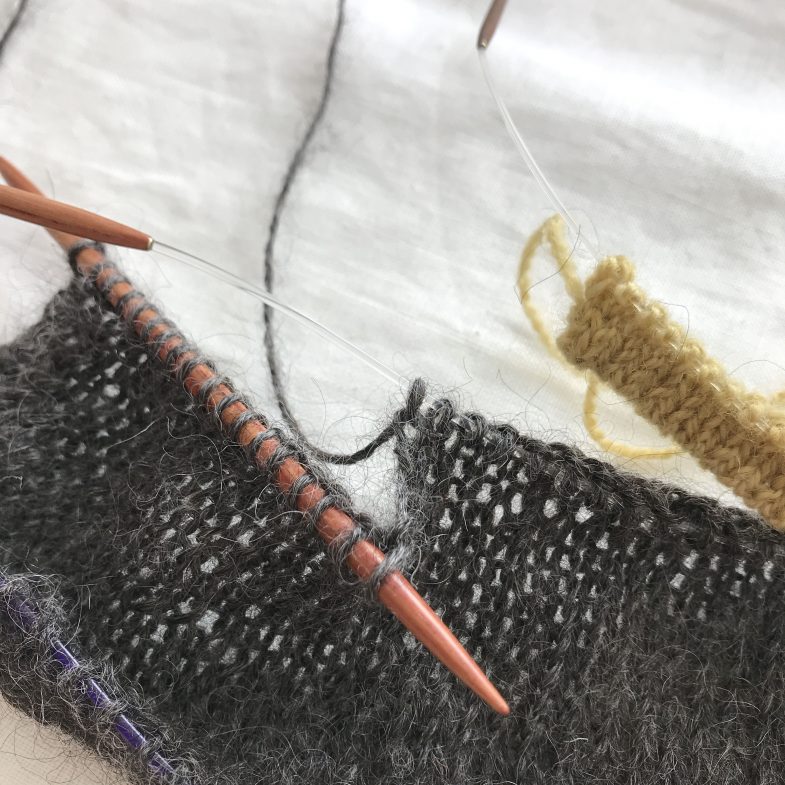
The lining is worked flat, back and forth with N2 and CC2 (blue yarn).
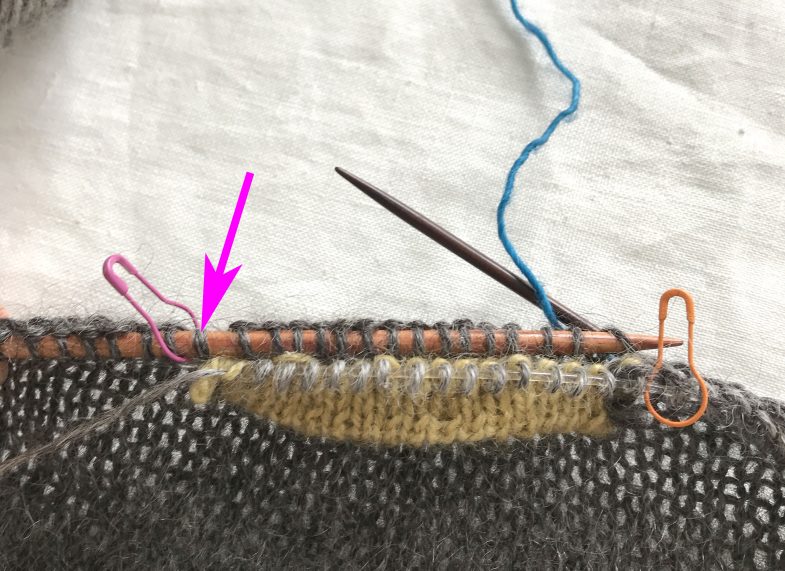
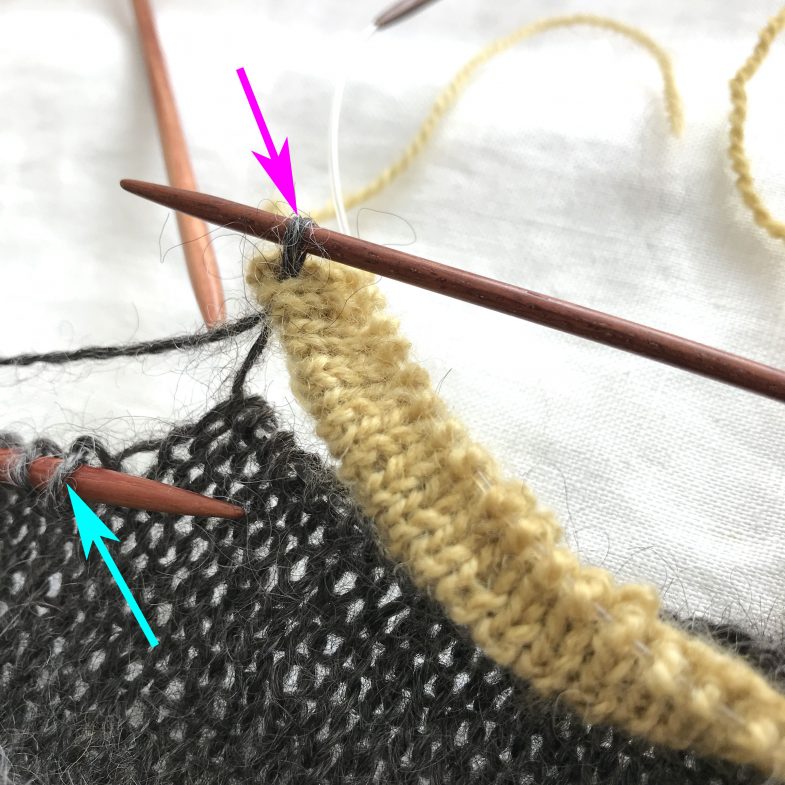
Welt stitches have been knitted to the last st with CC1/grey yarn and then pushed onto cable of N1 and set aside until later. With CC2 and N2 (smaller needle), now work the Body stitches on N1 to 1 stitch before Pm2. The pink arrow points to this last stitch (which is knitted together with the last welt stitch AFTER the Lining Flap is complete).
R1 (RS): With N2, CC2, and starting 1 stitch after Pm1, k14 (A-3), sl1wyf. 15 (A-2) sts
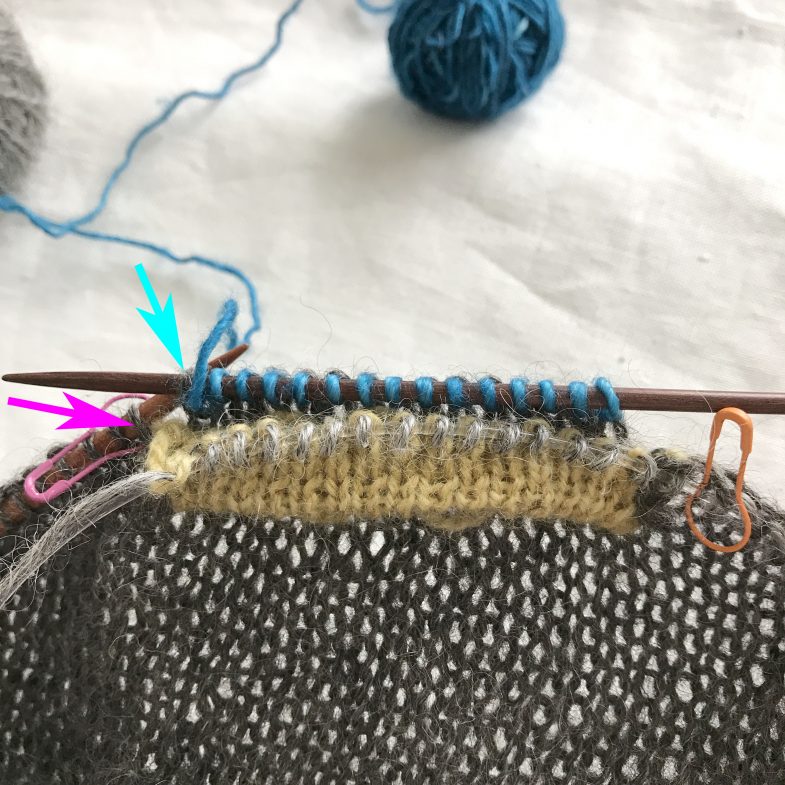
First row of Lining Flap is complete. Blue arrow points to final stitch (slipped with yarn in front). Pink arrow points to unworked stitch before Pm1.
Turn to work WS.
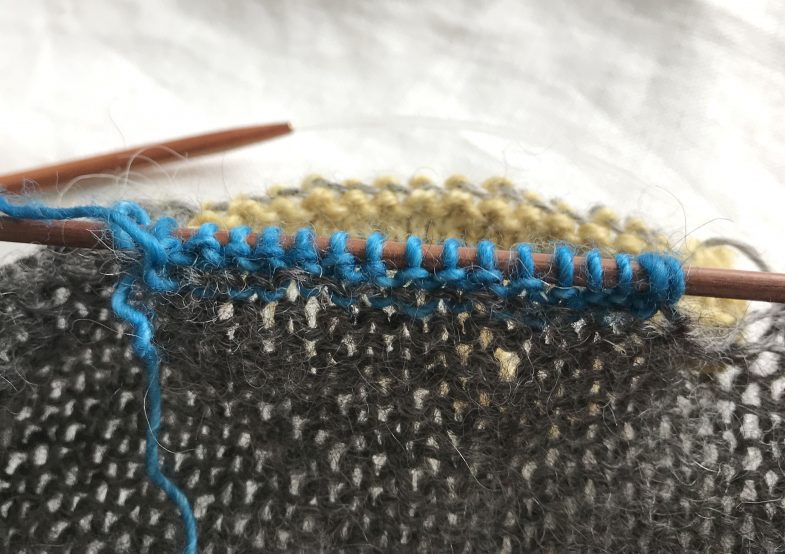
Row 2 (WS) of Lining Flap is complete – 2 sts increased
R2 (WS): K1, M1Lp, purl to last st, M1Lp, sl1wyf. 17 (A) sts
R3: Knit to last stitch, sl1wyf.
R4: K1, purl to last stitch, sl1wyf.
Work Rows 3 & 4 again x 9 (or to desired depth of pocket).
Cut CC2 (or leave attached for later adjustment of pocket depth). Slide stitches onto cable and set aside.
Lining Flap is complete, the last Body stitch (green arrow) before Pm2 is knitted together with the final Welt stitch (pink arrow)
Rnd 1 (N1) continued: Slip last Welt stitch to LN, k2tog, sm, work to end of round.
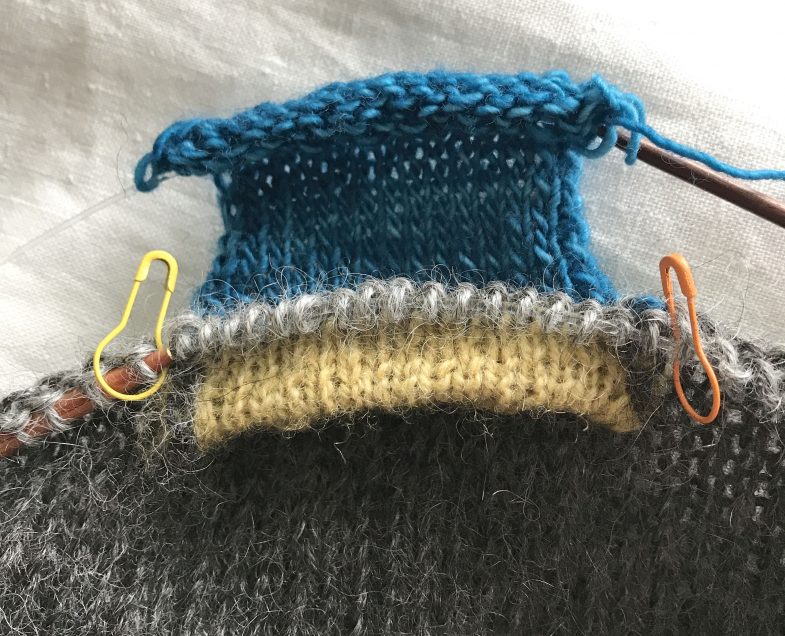
Lining Flap is done, first round of CC1 is complete. You will now attach the flap along each edge on every second round
Attach Lining
The lining is joined to the body on every second round.
Note: fetch yarn through both legs of the slipped edge stitch.
The first Body stitch after Pm1 is knitted together with a Lining Edge stitch – if you find it difficult to do this as one movement, it may be easier to first slip the Body stitch knitwise, then fetch yarn through the edge stitch (through both legs), then pass the slipped Body stitch over.
Rnd 1 (attachm-rnd): Knit to Pm1, sm, sl1 knitwise, fetch yarn through the lining edge-stitch, psso…
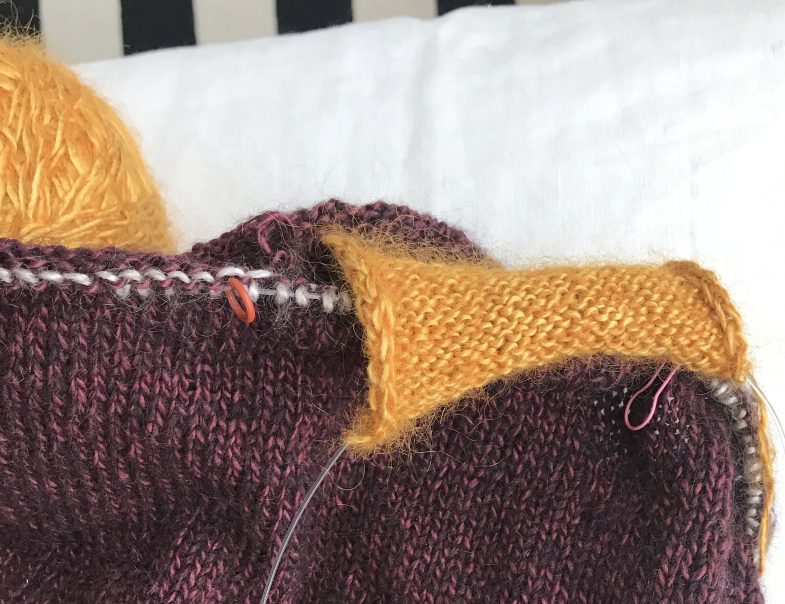
Rnd 1: The far edge (at Pm2) of the Flap is attached
Rnd 1 continued: …knit to 1 stitch before Pm2, knit this stitch together with edge stitch of lining (going through both legs), sm, work to end of round (and pay attention to the g1-stitch along sides and to waist shaping).
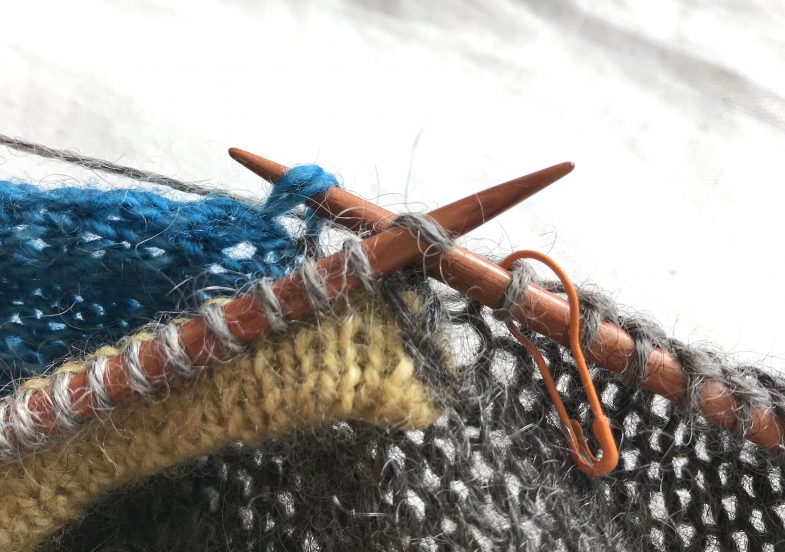
Rnd 2: Bar between stitches is worked together with first stitch after Pm1
Rnd 2: Knit to Pm1, sm, make twisted loop in bar between sts and place on LN…
The stitch after Pm1 is knitted together with loop-stitch
Rnd 2 (continued):… k2tog (body stitch together with loop), work to end of round.
Work Rnds 1 & 2 until body is level with lining or just slightly longer:
Close the Pocket
Body sts on N1 and Lining sts on N2 are knitted together, working 1 stitch from N1 and 1 stitch from N2 for each k2tog.
Closing Rnd: Work to Pm1, rm, slide N2-stitches onto needle tip, with CC1, k2tog (1 stitch from each needle) to Pm2, rm, work to end of round.
D.o.n.e.
Yarn in photos
Grey Sammelsurium: The Little Grey Sheep Gotland DK (and yellow 4ply Stein Fine Wool)
Maroon Simple Ziggurat: Fyberspates Faery Wings (earlier edition – new edition has just been launched)
Different Edgings
The Flap pocket can be made with different prepared edgings. For example, the Coucou tunic has a small cable that is attached as above – stitches are picked up along the cable edge to bridge the gap across the pocket opening:
Coucou knitted with Ripples Crafts Yarn Suilven
Or you can make a striped Welt…
Pullover in progress knitted with Tosh Merino Light
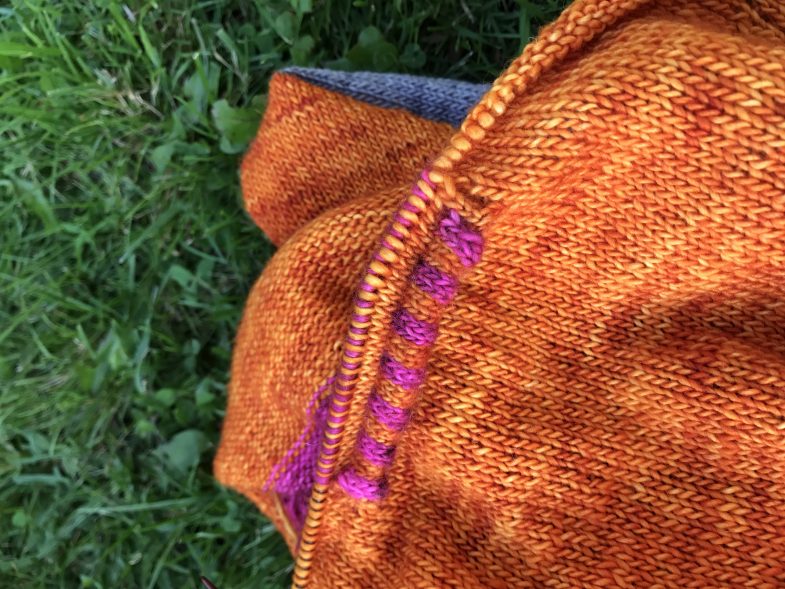
or a two-coloured Welt as on the Vaudeville tunic (single layer, double-knitted pocket and lining):
Vaudeville knitted with The Uncommon Thread Everyday Singles (peekaboo contrast is Ripples Crafts Yarn Burras)
Or a tightly knitted striped passe-partout that is almost like a cord – as on Bento Boksy (this pocket is also double-knitted, but I think I will knit my next Bento Boksy with the easier method of the Flap pocket):
Bento Boksy knitted with Rohrspatz & Wollmeise Blend
Anything you want!!
Want to know what else is up my knitted sleeve? Sign up for the occasional Åsa Tricosa Newsletter.

8 Comments
[…] Asa Tricosa ist zu Besuch bei Herrn U und gibt zwei Kurse. Ich nehme an dem Kurs für die Flap Pockets teil. Ja ich könnte das auch nach Ihrem Tutorial stricken. Aber ich mag Asa sehr gerne und freue […]
Thank you! It was so nice to see you again – but yes, I think that you don’t need ANY workshop in ANY technique as you are a master knitter.
See you next time! You can stop by for a chat after the workshop… 😉
åsa
p.s. I forgot to properly introduce you to Annette – she and you share the sewing bug.
Hi Asa, I am thoroughly enjoying making the pocket for my Sammelsurium. I am working on connecting the lining to the body. On round two, above, it says to tighten the first stitch after the pM1 by looping and knitting 2 together, but I am thinking that I should have used the same maneuver at the other corner of the pocket at pM2, rather than knitting across the rest of the round. The left side of the pocket edge is looser and my contrast colour for the lining is showing a bit. Am I correct??
Hello Jennifer!
Personally, I tighten it only at one end (the make-loop/decrease) where (for me) there is some extra slack. But, of course, if you find that your knitting have any gap, you can go ahead and tighten them in either the same way or some other way that makes it look pretty. It’s a judgement call and may vary from pocket to pocket and sweater to sweater. (Often, you can also tighten any slack after the fact by pulling on the yarn to redistribute the ‘extra’ across several stitches, away from the gap.) Good luck!
The welt looks lovely. I wonder if this could work on a bottom-up construction.
Yes, I should think so… at least in some fashion. The edging on one of the pockets in the Ziggurat Book is worked upwards from the pocket opening. You’d need to figure out how to close the welt or graft it to the outer layer?
Hello Asa,
I have a question regarding your directions.
One line says, “Rnd 1 (attachm-rnd): Knit to Pm1, sm, sl1 knitwise, fetch yarn through the lining edge-stitch, psso…”
Is it safe for me to assume (attachm-rnd) means (attach m-rnd)… “m” meaning marker?
Thank you for clarifying it for me.
LOVE your site, tips, techniques, patterns and sense of humor!
Hello!
Attachm = attachment.
Attachm-rnd = attachment-round
(because you attach only on every second round – or when knitting flat, only on RS rows).
Cheerio! /åsa