Åsa’s Amazing Tab Cast On
The stitch counts below are particular to the Bakau shawl, which has a 7-stitch edging.
For other edgings, cast on Number of Edging Stitches + 1.
See also the photo tutorial for the Winding Cast On.
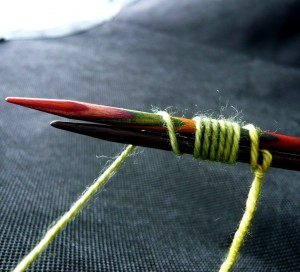
Cast on (wind on) 8 sts.
Work Row 1 (RS) of the edging pattern.
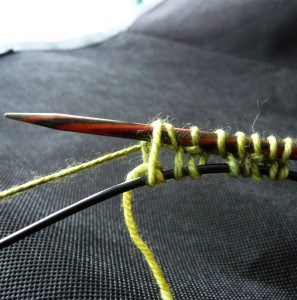
On the cable below, the 8 provisional live stitches are sitting idly.
Leave those stitches alone for now.
(The slip-knot has slid under the last (slipped) stitch — not a problem. It can be pulled out later.)
Work edging pattern back and forth.
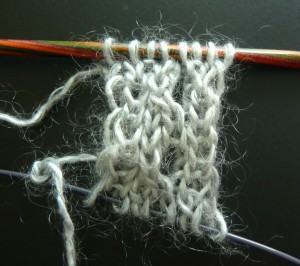
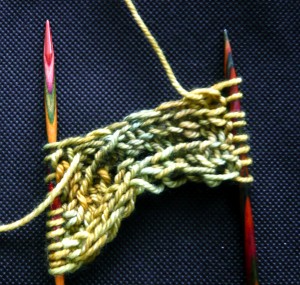
You now have half a tab.
You are ready to pick up stitches along the left edge to take you to the live stitches on the bottom cable
Note: The last stitch on RS rows is slipped purlwise with yarn in back.
This creates a neat edge for picking up stitches.
The first ‘proper’ row of the Bakau shawl requires 7 shawl or body stitches to start.
For other shawls you may need more or less for your initial row.
For more stitches, work a longer tab. For fewer, work a shorter tab.
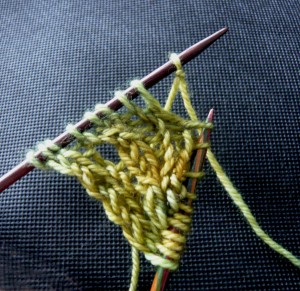
Three stitches have been picked up along the left edge (the last three stitches on the Right Needle).
The formerly idle circular needle at the bottom (on the left in photo) has been pulled through (= the stitches have been slid onto the needle from the cable) and you are ready to slide off (and discard) the slip-knot (sitting far right on the Left Needle) in order to work the 8 live stitches back and forth for a few rows.
This creates the second half of the tab.
Or the second part – depending on your edging pattern the two halves may not be equal in length.
For the most minimal tab in stocking or garter stitch you could work as few as 2 – 4 rows in each direction.
The stitches on the Right Needle are left alone and are not worked until later.
You may have to pull the needle through — to let those idle stitches sit on the cable rather than on the needle — in order to comfortably work the 8 stitches on the Left Needle.
Row 16 (WS) – and also seen from WS in the photo.
The Bakau tab is complete and you are ready to pick up more stitches along the edge.
This will carry you across to the 11 stitches (8 edging + 3 picked up) that have been sitting idle for the last few rows.
On the left: is Left Needle with the 8 + 3 stitches that have been slid onto the needle to make them available for knitting.
On the right: Right Needle with 8 edging stitches, ready to pick up 4 sts in along the edge and then work the 11 sts on the Left Needle.
You are curving/bending the tab to join up all your stitches.
This sets them side by side so you can knit across all stitches for the remainder of the shawl, beginning and ending with the edging:
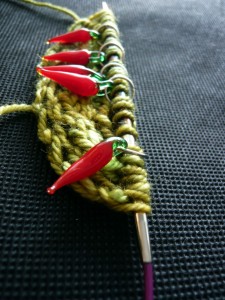
Row 17 (RS) of the Bakau pattern has been worked in this photo.
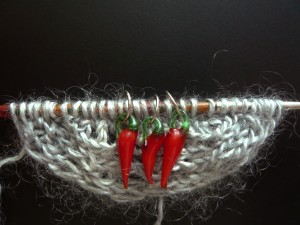
The setup is complete with stitch markers in place.
The photo shows only three markers. The pattern has 5 — an additional one at each edge like this:
I work with as few stitch markers as I can get away with (often none).
For pattern writing purposes, it is mostly easier for knitters to find their way if the instructions say “knit to marker” instead of “knit to the last 7 sts, blablabla….”
Incidentally, those are my favourite stitch markers. They are from fripperies & bibelots and were a present from EmmaCo.
Want to know what’s up my knitted sleeve? Sign up for the occasional Åsa Tricosa Newsletter.

6 Comments
Mayhem shawl: set up chart l.- LOOP -does tis refer to the cable wire; or refer to looping over to second needle to the live un-knit stiches.
2nd problem: after discarding slip knot, I have one less stich on the second needle. I am not sure how this occurred.
Love the pattern, can’t get passed set-up
Hello! So sorry I have missed your question until now!
1. the LOOP refers to the cable wire – you’ll need to pull out enough slack to be able to work the sts as they’re almost at a 90 degree angle.
2. Don’t worry about the missing stitch. Just make an increase where needed (either to add a stitch to the border or immediately next to the border to get the correct number of body sts. (If you are on Ravelry, you can get quicker and often better advice from knitters who have knitted the shawl more recently than I have or are knitting it right now: http://www.ravelry.com/discuss/asa-tricosa/3397462/301-325#325)
Thanks for writing! knit with abandon!
åsa
Hi Asa – I too am having trouble with the Mayhem shawl. I have gotten to the end of chart 2 set-up. I am STUCK – I can’t get move along to the p5, sm (p1k1) 8 times, p1k1 across row to end, 47 sts
Please help. I love the pattern & am anxious to move on. Thanks so much
Hello there!
I’ll try to explain:
You work the final WS row as set to the penultimate st.
Place a marker, p1 (the final st of your WS row).
Now you need to pick up and purl 5 sts (p&p5) in the slipped-stitch edge of the tab. To do this you flip the work around so that the RS if facing you, and then pick up 5 sts knitwise going from left to right – to meet the previously p&k sts (Step 1, Row 11).
Pick up is complete.
Flip work over to WS again.
Now continue as per instruction to p5,sm, work the 18 (14) edging sts.
I hope this helps. Good luck!
åsa
p.s. You are welcome to post in my Ravelry group where there are more able knitters around to offer better suggestions than I usually have on tap.
Hi,
I am wanting to knit a Quadratura Circularis cowl and the instructions say to cable cast on. I cannot find instructions anywhere for this cast on…..HELP
Hello there! You can use any cast on that is not too tight. I think I opted for the cable cast on rather than my go-to Longtail Cast On so I wouldn’t have to worry about the length of yarn to set up for the long tail. You should be able to find several good tutorials for both on YouTube. Here is one for the cable cast on: link
Good luck!